How to Make Your Own VPN – It’s Not As Easy As Some Tutorials Make It Look

If you’ve ever been curious about making your own VPN, this article is for you. Maybe you’re up for the challenge of creating a completely customized VPN or you’ve been burned by a less-than-trustworthy VPN in the past.
Whatever your reason, you might want to rethink your options. Making your own VPN isn’t as easy as online videos make it sound, and online tutorials can be extremely misleading.
I’ll help walk you through how to make your own VPN and you can decide for yourself if that fits your needs or whether a professional option may be a better fit
Table of Contents
Why You Might Want to Make Your Own VPNChoosing the Right VPN for Your Needs
Simplify Online Protection with PIA
FAQ
Why You Might Want to Make Your Own VPN
You’ve heard about shady free VPNs, proxies loading your devices with malware and trackers, and professional VPNs handing over your online data on request. To avoid shady practices, you could decide to make a VPN yourself.
It looks pretty simple in Google search descriptions and YouTube tutorials, and your connection is free from third-party interference. It’s tempting to choose a self-made option, and a DIY VPN comes with multiple benefits.
- ✅ Personal control over access and security
- ✅ Endless customization possibilities
- ✅ You have several options for making a VPN
Choosing the Right VPN for Your Needs
You have several options when building your own VPN — these include virtual private servers (VPS), virtual machines (VMs), and purchasing a physical VPN server. If you’re not sure which is best for you, you’re not alone.
Navigating the world of DIY VPN options can be complicated and tricky. Let’s take a look at the basic pros and cons of each option, so you can make an informed choice.
VPN Server
Purchasing a VPN server limits you to your home network service area unless you purchase one allowing you to configure different locations or have them preset. If you only need secure access to your favorite local accounts on vacation, this isn’t a problem, but accessing international content isn’t possible without extra work.
With a physical VPN server, your bandwidth is limited by what your equipment supports and what your ISP provides. Since most ISPs provide more download than upload bandwidth, you could be dealing with massively slow speeds, especially when streaming. When you choose PIA VPN, you get access to our entire 10 Gpbs server network and unlimited bandwidth, so you can stream uninterrupted virtually anywhere.
VPS and VM
A VPS or VM provides more location selection options and you don’t have to worry about maintenance. Yet it may not bypass geo-restrictions and you’ll need to pay close attention to the service’s privacy policy. You give VPS and VM services your name, location, and financial information, so make sure they have an iron-clad no-logs policy before signing up.
VPS and VM services have bandwidth limitations, too. With a VPS or VM, your bandwidth is limited to what you pay for. While the base plan is usually cheap, the more bandwidth you want the more expensive it gets.
- 💡 Pro Tip: While you may not hit a cap, charges for going over your initial data and bandwidth limitations on VM, VPS, and similar services can be costly. Be mindful of the overage fees your service applies to bandwidth and data. Whenever possible, choose a service that offers a bandwidth guarantee, to ensure you’ll always have adequate coverage for your needs.
Discover more information on pricing and other features for each option in the table below. We included Private Internet Access as well, so you can compare each against a premium VPN provider.

How to Make Your Own VPN
Depending on which method you choose, you may need to take the following into account: the strength of your central processing unit (CPU), storage and RAM limits, compatibility, preinstalled software, general support, and more.
That said, let’s get started building your personal VPN.
- 💡 Pro Tip: Always check your existing software and hardware to make sure it’s compatible with the specifications/requirements for the server and VPN software you want to use. You may not have the correct software, as some are Operating System (OS) specific.
Pick A Server Solution
You will need a VPN server to hide your physical IP address. Luckily, you have a few options to choose from in this department.
Option 1: Buy A VPN Server
Some VPNs offer multiple IPs, which are preset on the server. However, many of these VPN servers use the same virtual global IPs for all users, so you may deal with major congestion.
The upside is you own the server and are the only person with access to it. You can set secure passwords and SSH keys as you can with VMs and VPSs, and customize features to the full extent of your ability. Additionally, you don’t pay any monthly fees for the server. Most VPN servers work well with simple interface software like OpenVPN or can be set up using Command Prompt without much effort, if you know how.
Option 2: Use A VPS
A VPS is a quick solution for a DIY VPN and offers shared and dedicated servers. Shared hosting requires you to share server resources with other users, which can slow your speeds and affect other performance factors.
For VPS hosting, I chose DigitalOcean.The base plans are affordable and you can choose a shared VPS if you want to save a bit more. DigitalOcean also has dedicated virtual servers (at an extra cost), so you get more control over server configurations and don’t need to share resources.
How to Get A DigitalOcean VPS
1. Create an account with DigitalOcean and log in.

2. Choose Create and then Droplet to build your virtual server.

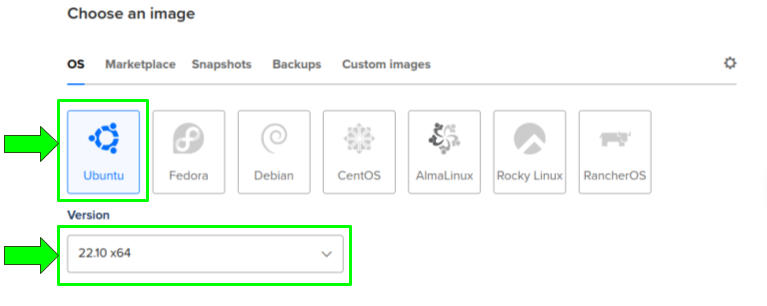
3. Choose your operating system and version.
4. The most affordable option is Basic under the Shared CPU option, but you can also choose a Dedicated CPU option.

5 Pick your authentication method. SSH Key is the default selection, but you can also choose to authenticate with a Password if you’re more comfortable logging in that way.

6. Select the number of droplets you need and a hostname for your server. Add any relevant tags and pick a project.

7. Confirm your choices. The virtual server will begin to build. Don’t leave the page until it’s completely finished.
8. That’s it! Once the build is complete you can log into your server and get your IP address to begin the VPN setup on your device.
(Source: DigitalOcean.com)
Unfortunately, you still share a physical machine with other VPSs, and one machine can only handle so much traffic.
Option 3: VM Services
Google Cloud hosts VM services via Compute Engine, and you can choose from a variety of VMs. High-CPU E2 VMs provide better savings long-term and work well as web servers because they can efficiently manage network resources. You also get a 30-day free trial of Compute Engine and full VM support. The downside is you run your traffic directly through Google, the king of data accumulation.
If you feel you can trust Google with your private information, it’s worth noting it also offers N1, N2, N2D, C2, and C2D VM options, where you only pay for what you use. These VM types are more practical for businesses and corporations because they support more people accessing the VM simultaneously.
Another option is a Linode VM, a Linux-based virtual machine with DDoS protection, full VM support, a user-friendly cloud manager, and a 7-day money-back guarantee. I’ll use Linode as an example of how to create a VPN server with a VM, as the process is reasonably straightforward. This time I’ll choose a dedicated VM but shared options are available.
How to Get A Linode VM
1. Create an account with Linode and enter your payment information.

2. Choose your distribution, app, or image (I used distribution 20.4 LTS).

3. Select a region (e.g., US or UK).

4. Choose a VM plan. I chose a dedicated CPU as we’ve already covered a shared option.

5. Create a label for your Linode VM and add any relevant tags.

6. Create a root password — you can also add SSH keys in this step.

7. Confirm the information for your Linode VM is correct, then click on Create Linode.

8. That’s it! Log into Cloud Manager and click on Networking. Then find your IPv4 and IPv6 addresses by clicking on the ellipsis (…) to the right of your Linode VM instance.
(Source: Linode.com)
VPN Software
A majority of VPN servers, VPS, and VM are compatible with most forms of interface software, including OpenVPN Connect. It’s rare, but some VPN servers, VMs, and VPSs are only compatible with specific VPN software.
Let’s take a look at how to set up a VPN at home using OpenVPN Connect and DigitalOcean VPS.
How to Set Up Your DIY VPN with OpenVPN Connect
1. Make sure you have your URL or server’s IP address and other information ready, then download OpenVPN Connect for your device. (I used my Android phone).

2. Once you’ve downloaded the app to your device, the URL of your server (or import server profiles from your provider’s site), click the Next button.

3. Enter a username and password, and make sure to keep your password somewhere safe. Your profile name will auto-populate. Check Connect after import. Finally, click on the Import button.

4. That’s it! The VPN will connect once OpenVPN Connect is done importing your server information.
(Source: OpenVPN Connect)
Why Using A DIY VPN Can Go Wrong Fast
VPN services that adequately protect your data and devices require regular maintenance, including security and software updates. If updates aren’t applied on time, or at all, everything connected to your network is at risk.
Viruses, spyware, trackers, and cybercriminals may infiltrate your network and devices. This can lead to potential issues like network failure, location tracking, identity theft, financial fraud, software/hardware damage, and unintentional involvement in DDoS attacks.
When you build your own VPN, in most cases, you become the maintenance crew. The options I chose include customer support and some maintenance, but it isn’t the norm.
- 💡 Pro Tip: Any technical support offered for a VM, VPS, or physical server only covers the server. You don’t receive support for VPN-related issues.
It seems more cost-effective to create your own VPN server and avoid those pesky monthly fees, but you’ll have to program in advanced features which your VPN interface software, VPS, VM, or VPN server doesn’t have. This includes features like a kill switch, anti-virus, ad/malware blockers, split tunneling, DNS protection, and more.
PIA comes with all of the extras built-in, including an all-in-one tracker blocker and a Kill Switch. You just need to click a button to turn on the VPN and activate them. It’s as simple as that. PIA also offers an antivirus as an optional add-on.
Simplify Online Protection with PIA
Now that you know how to make your own VPN, it’s up to you to decide. Will you choose a DIY option that could potentially expose your data and limit essential resources, or go with a trusted VPN service?
Private Internet Access offers expert customer support 24/7, comes with a money-back guarantee, and you can set up our VPN in 3 steps — that will take all of 5 minutes to complete. You won’t find that in a DIY VPN solution, besides, all of PIA’s advanced features are built into our app. That means we cover every aspect of maintenance, so you always get the latest fixes and updates.
FAQ
Can you make a free VPN?
Yes, but it’s a bad idea. Using a free, reputable VPN interface like Amnezia or OpenVPN Connect is okay. However, you put your data at risk using a free server or proxy to make a VPN. Most are riddled with security holes opening a backdoor to your network and putting your privacy at risk.
PIA has no backdoor and you get a 30-day money-back guarantee. We use unbreakable AES encryption to scramble your online data and provide an advanced Kill Switch to prevent leaks.
How do I make a VPN?
You can buy or rent a VPN server, or rent VM or VPS servers from services like DigitalOcean or Google Cloud. Then you need to find the correct VPN software — if it didn’t come with the server. Some options are OpenVPN Connect, Amnezia, or using the command prompt. To make a basic VPN follow the instructions under How to Make Your Own VPN.
Is it a bad idea to build your own VPN?
Yes, even if you’re tech-savvy. Building a VPN is complicated because one wrong configuration can leave your data exposed and give cybercriminals access to your network. Additionally, many of the tutorials you find online are misleading and only provide bare-bones information. That means you’ll need to look for how to create advanced features like a kill switch elsewhere.
Don’t complicate your life — you can secure your data with PIA in three steps. You also get additional security features built-in and all you need to do is toggle a button to turn it on.
Why is PIA safer than a DIY VPN?
We have 10+ years of experience with VPNs and a court-tested No Logs policy — PIA never collects usage data. Our VPN has the most advanced security and privacy features, including a Kill Switch, Split Tunneling, RAM-only NextGen servers, AES encryption, and more.
You can view our VPN app’s source code on GitHub any time, and we use open-source protocols. PIA’s open-source philosophy makes it easier to find and apply fixes in real time. Unlike a DIY VPN, which requires you to find and install all the updates for your software and hardware on your own.
