How To Fix “No Internet, Secured” on Windows 11

Your PC is connected to the internet, but for some reason you can’t access any web pages. So you check your Wi-Fi connection and you see the error message “No internet, secured.”
It’s not the easiest message to understand, but rest assured it’s pretty common and doesn’t usually indicate that there’s a security threat or a major PC malfunction.
The good news is, it’s a relatively easy problem to fix. In this guide, we’ll show you how to fix the “No internet, secured” error on Windows 11.
What Does “No Internet, Secured” Mean?
If you’re seeing the message “No internet, secured” on a Windows device, that means that your computer is connected to a Wi-Fi network that is password-protected (hence, “secured”), but unable to access the internet. In layman’s terms, the connection between your device and the router is working, but something is blocking you from actually accessing the internet.
Think of it like this:
✅ “Secured” = You’re connected to a Wi-Fi network that uses encryption (like WPA2), so the connection is password-protected.
❌ “No internet” = Although connected to Wi-Fi, your device isn’t able to reach the internet.
Despite the wording, this error isn’t a sign of a security threat. It is most likely a problem with your router or misconfigured network settings. It can also result from conflicts with your VPN and security software, or from compatibility issues with IPv6.
Check Why You Have “No Internet, Secured” (Try These First)
The “No internet, secured” issue can come from 3 places:
- Windows computer
- Router (modem)
- Internet service provider (ISP) issues
We recommend identifying the root cause of the issue step-by-step, starting from the easiest method.
Check If the Problem Affects the Whole Network
Test another device on the same network to see if it has the same issue. Depending on the results, it can mean:
- If other devices work: The issue is with your Windows device. Proceed to ping the router address from Windows.
- If no device has internet: This is a router (modem) or ISP-related issue. Go to test internet access from the router admin panel.
Ping the Router Address from Windows
This check tests the shortest path from your Windows PC to your router.
- Press Win key and type cmd to find the Command Prompt, and select Run as administator.
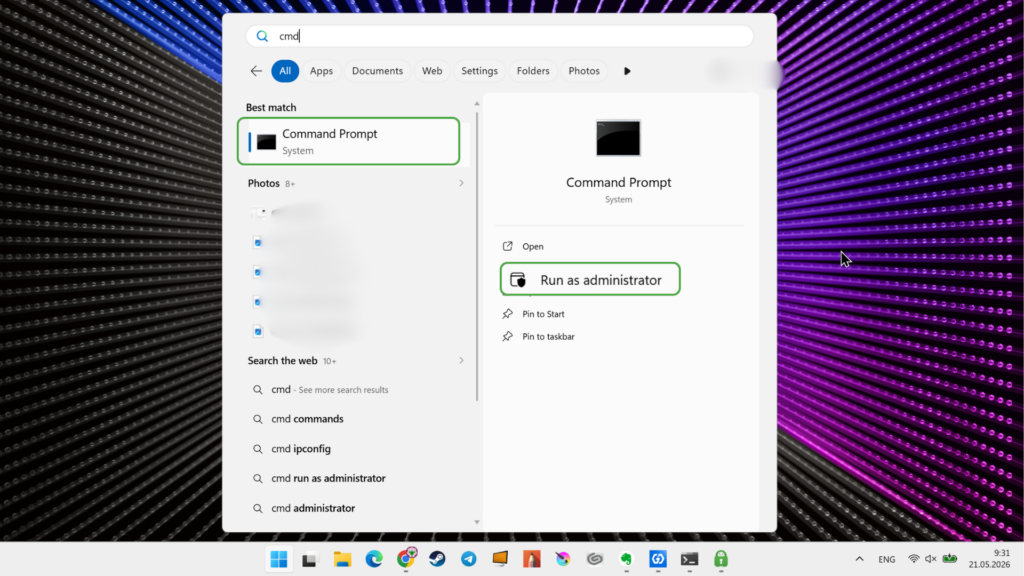
- Enter ipconfig to show current network details.
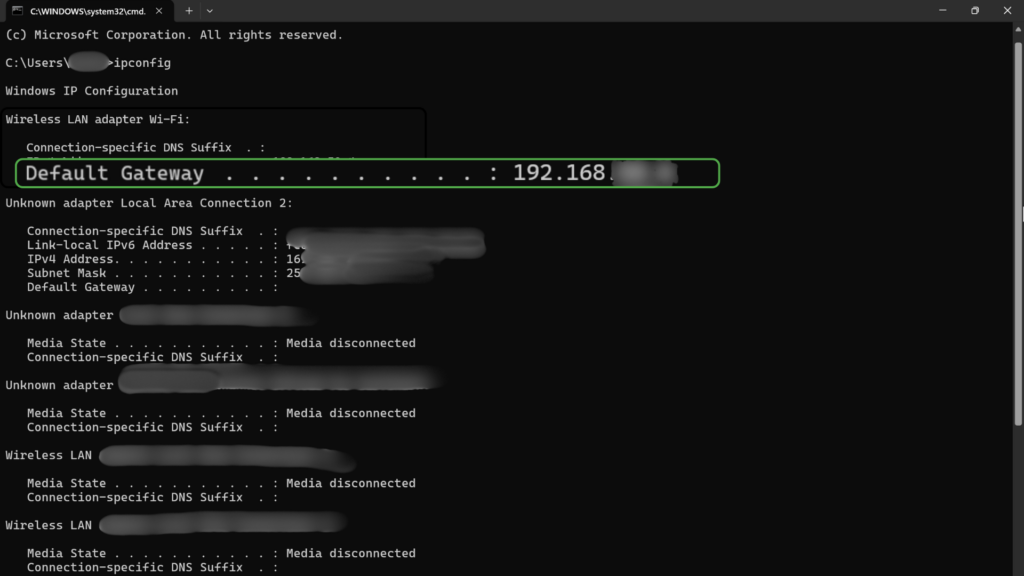
- Copy the Default Gateway address of your Wi-Fi (should look like 192.168.0.1). If this option is missing, Windows did not receive a proper router address. Go to Release and Renew Your IP Address.
- Type ping and add the address from above (e.g., ping 192.168.1.1).
Check the results:
- If Windows receives replies (lines that start with Reply from [address], followed by bytes and ping), your PC can reach the router. Go to Ping a Public IP Address to Test Internet Routing.
- If the gateway pings time out, your PC cannot reliably communicate with the router. You must renew your IP address.
Ping a Public IP Address to Test Internet Routing
A public IP ping tests whether your PC can send traffic beyond the router.
- Open the Command Prompt
- Run the following commands to test whether traffic reaches a public internet address:
- ping 1.1.1.1
- tracert -6 google.com
- nslookup google.com
- nslookup google.com 1.1.1.1
Here’s what this will tell you:
- If step a works but step b fails, your router or ISP may have IPv6 routing problems. Try to disable IPv6.
- If only commands c and d work, your DNS settings might be at fault. Your next step should be to set the DNS manually.
- If the ping doesn’t return, the router or your ISP might block the connection. Your next step here is to test internet access from the router admin panel.
If your ping only works sometimes, it could be due to a weak Wi-Fi signal. Try moving your device closer to your router or connecting it with an Ethernet cable.
Test Ethernet for Wi-Fi Failure
A wired connection is an effective way to diagnose Wi-Fi issues.
- Connect the PC to the router’s LAN port via an Ethernet cable and turn off the Wi-Fi.
- Try opening a site in your browser or entering run ping 1.1.1.1 in the Command Prompt.
Check the results:
- If Ethernet works, your Wi-Fi adapter settings may be the cause. You will need to repair the Wi-Fi adapter path.
- If Ethernet also fails, the problem likely affects Windows networking more broadly. You should test the router admin panel or fix your VPN settings.
Test Internet From the Router Admin Panel
Next, you should test if the router itself can reach the internet.
- Open a browser and enter the Default Gateway address you got from the ipconfig command in the Command Prompt (such as 192.168.1.1).
- Sign in to the router admin panel using your password or the default credentials (usually printed on a label on your router).
- Go to the diagnostics menu (it may be named Diagnostics, Tools, Troubleshooting, WAN, or Internet).
- Run a ping from the router to 1.1.1.1 to test the internet access from the router itself.
- If the router cannot access the web, you should contact your ISP directly or check your VPN settings.
If you’re still getting the error message after all these checks, you’ll need to go deeper and apply fixes.
How To Fix “No Internet, Secured” on Windows 11 (Advanced Methods)
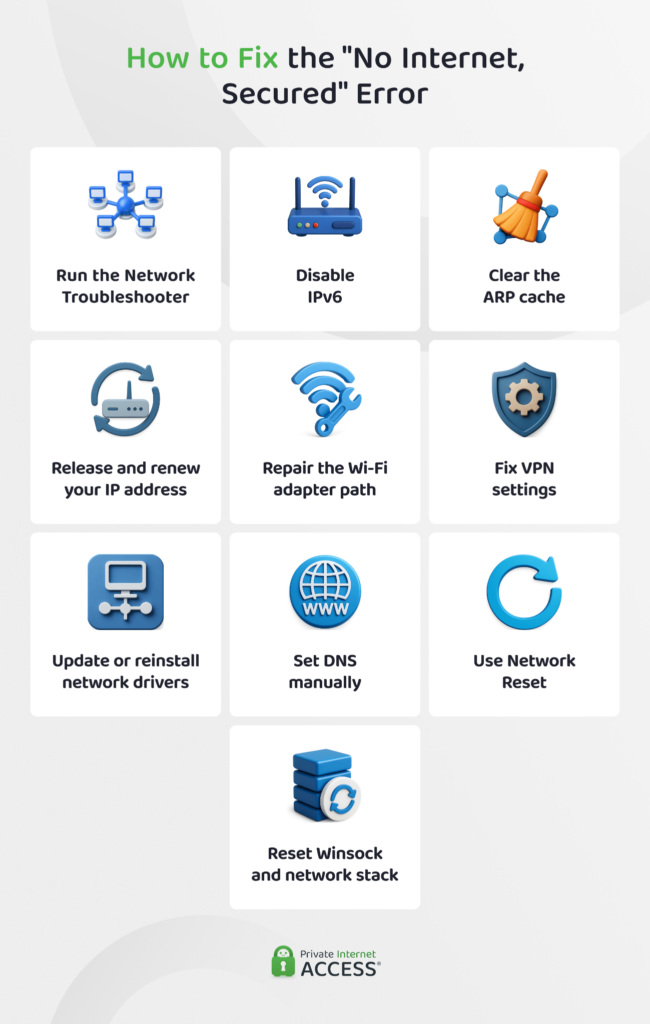
Here are a few of the most common solutions to the issue that should help get your internet working.
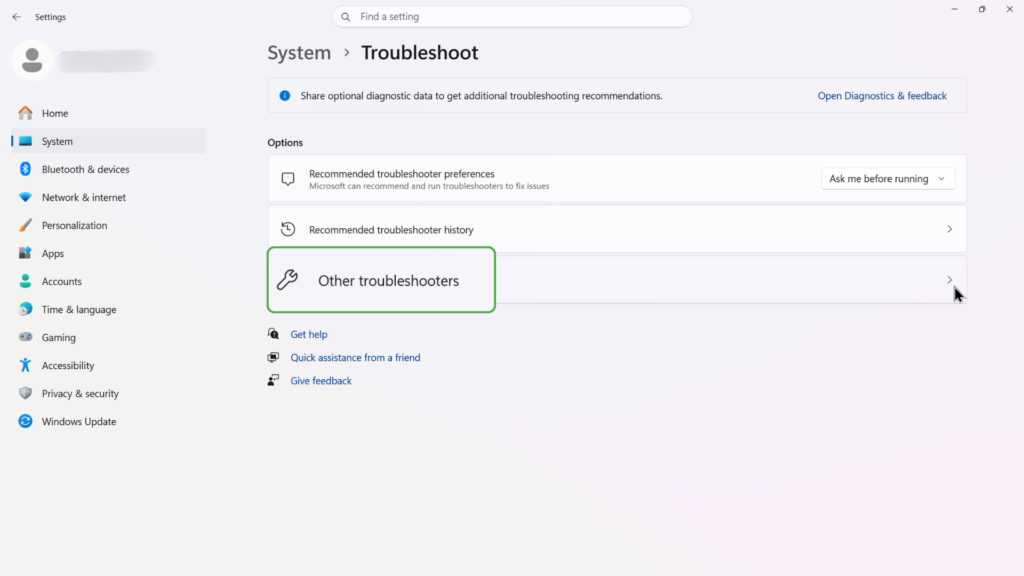
Run the Network Troubleshooter
Windows 11 includes a built-in troubleshooter that automatically finds and repairs problems with your network. Here’s how you can use it:
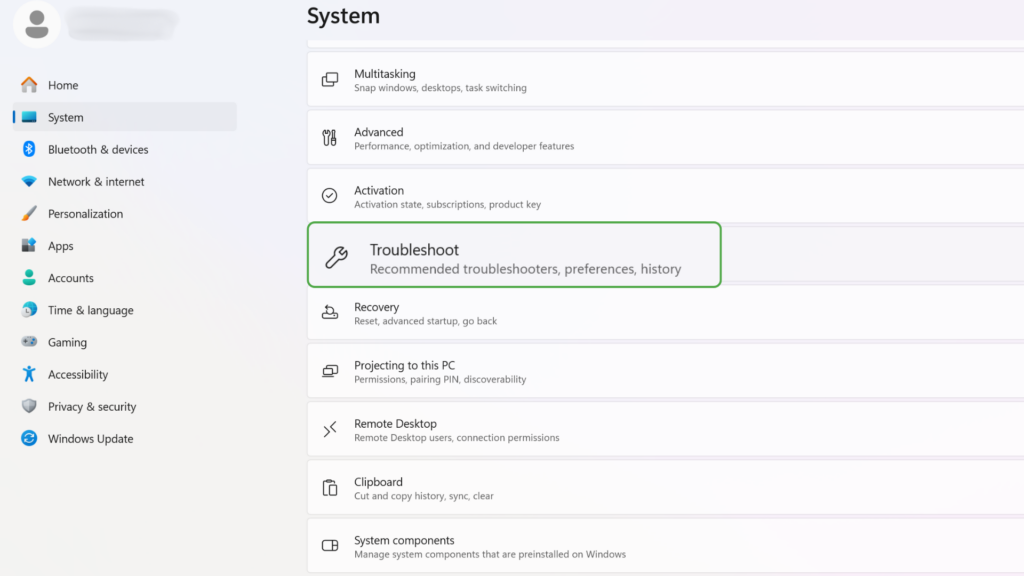
- Open Windows Settings, go to System and click Troubleshoot.
- Select Other troubleshooters.
- Click Run next to Network and Internet.
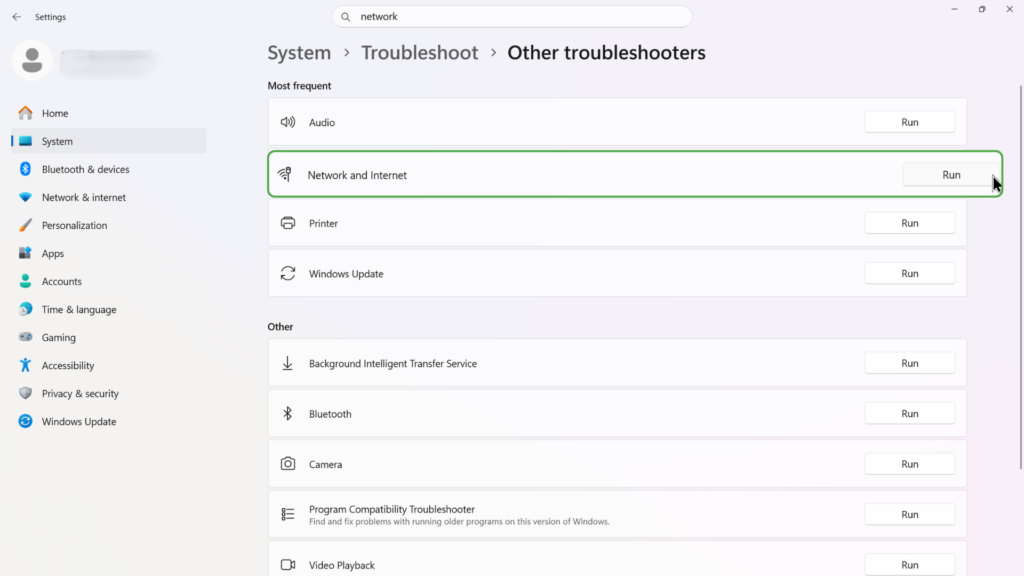
- Follow the prompts, as this may automatically fix IP or DNS settings.
The Network Troubleshooter can solve most issues or at least point you in the right direction. But if it can’t, you have plenty of other options.
Disable IPv6
IPv6 is a newer protocol that may not be supported by older internet routers. Trying to use IPv6 on an incompatible network can interfere with your connection and create errors such as “No internet, secured.” Follow these steps to disable IPv6 on Windows 11:
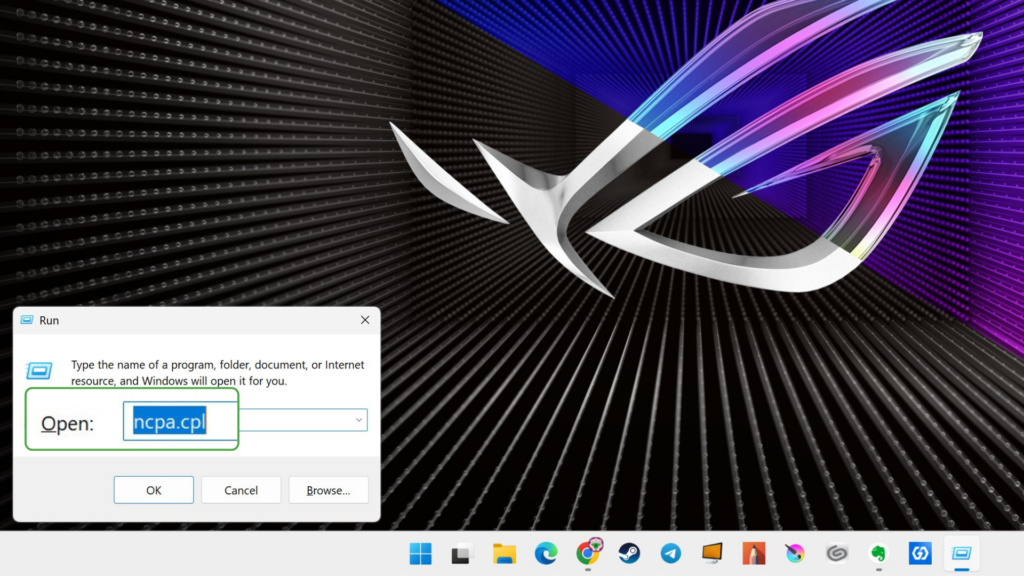
- Press Win + R, type ncpa.cpl and press Enter to open Network Connections. Alternatively, you can click Start > Settings > Network & Internet.
- Right-click your Wi-Fi adapter and select Properties.
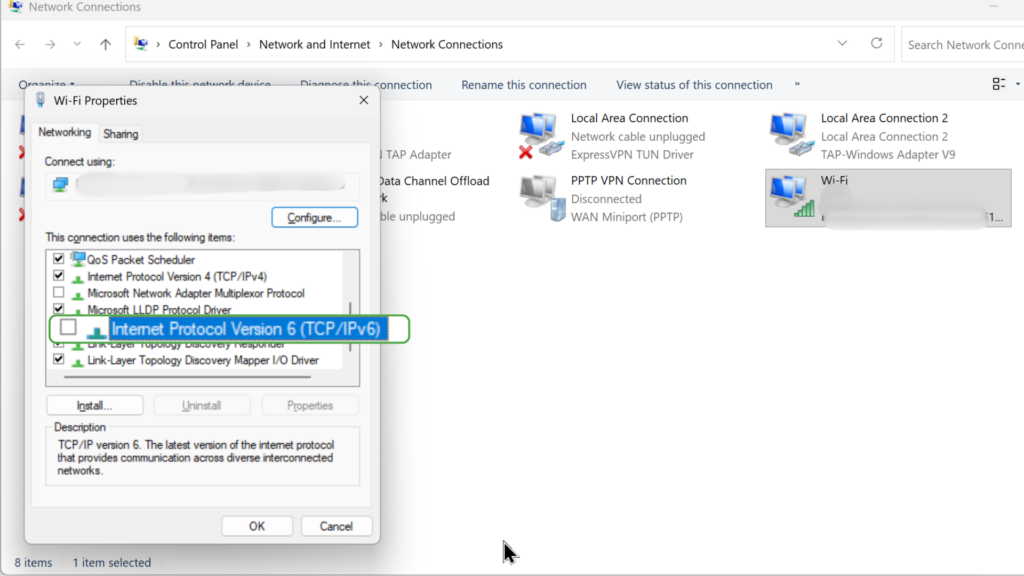
- Uncheck Internet Protocol Version 6 (TCP/IPv6).
- Click OK and restart your computer.
Clear the ARP Cache
ARP is the local lookup Windows uses to match a local IP address with a device on the same network. If that local mapping goes wrong, devices on your network may not be able to communicate properly.
- Open Command Prompt.
- Run arp -d * (to delete and renew local device mapping).
- Restart the router through its power button or power cable.
- Reconnect to Wi-Fi and ping the Default Gateway again by running ipconfig in the Command Prompt.
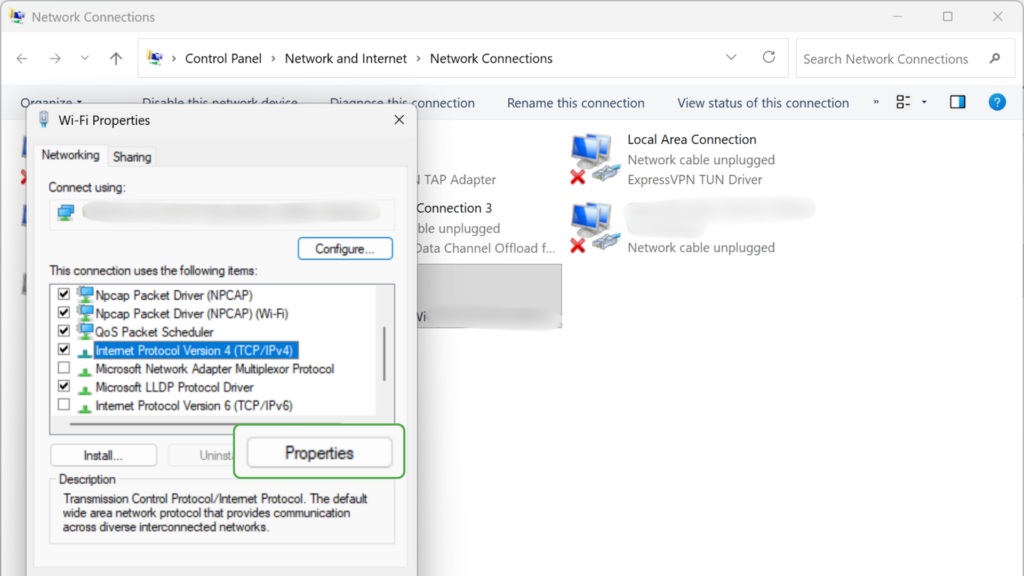
Release and Renew Your IP Address
If your IP configuration is outdated or incorrect, that could also interfere with your connection. Refreshing and renewing your IP configuration will assign a new IP address to your device and may solve the issue. Here’s how to do it:
- In your Wi-Fi adapter’s Properties, select Internet Protocol Version 4 (TCP/IPv4), then choose Properties.
- Make sure Obtain an IP address automatically and Obtain DNS server address automatically are selected (should be on by default).
- Press Win + X and select Terminal (Admin).
- Enter the following commands one at a time:
- ipconfig /release (forces your computer to abandon the currently assigned internal IP addresses)
- ipconfig /renew (tells the PC to assign new internal addresses)
Press Enter after each command and then restart your computer. Doing this will assign a new IP address to your device. Once your computer restarts, check your internet connection to see if the problem has been resolved.
Repair the Wi-Fi Adapter Path
A Wi-Fi failure usually points to the wireless adapter or settings.
- Go to Settings, Network & Internet, Wi-Fi, and select Manage known networks.
- Choose your Wi-Fi network, select Forget.
- Rejoin the network.
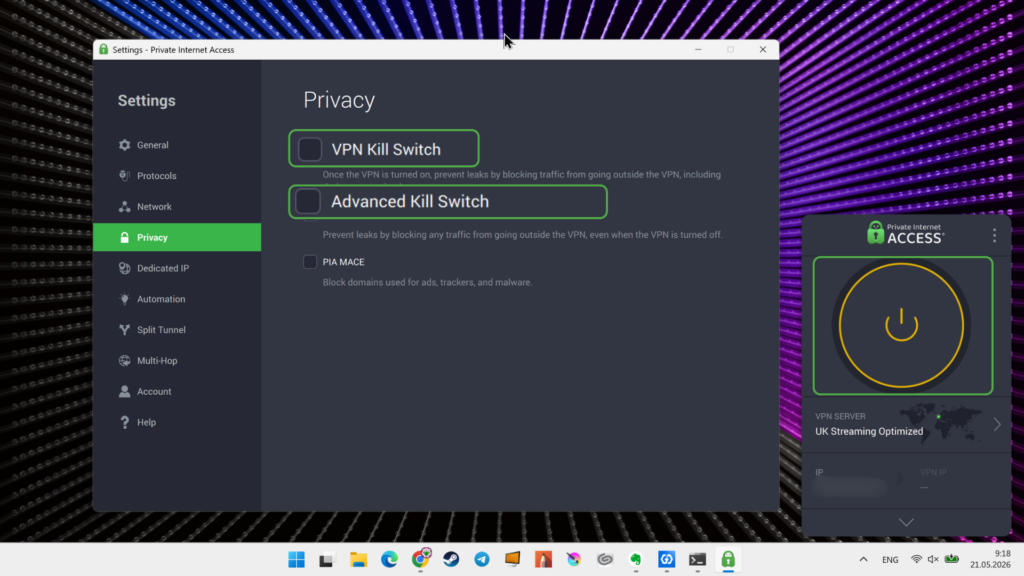
Fix VPN Settings
A VPN (Virtual Private Network) can block your entire connection in some cases. These steps use Private Internet Access (PIA) VPN as an example, but the same principle applies to other VPNs.
- Open the VPN app and see if it’s connected to a server.
- Go to Settings, then Privacy, and disable the Kill Switch feature (which blocks your internet connection when you’re not connected to a VPN).
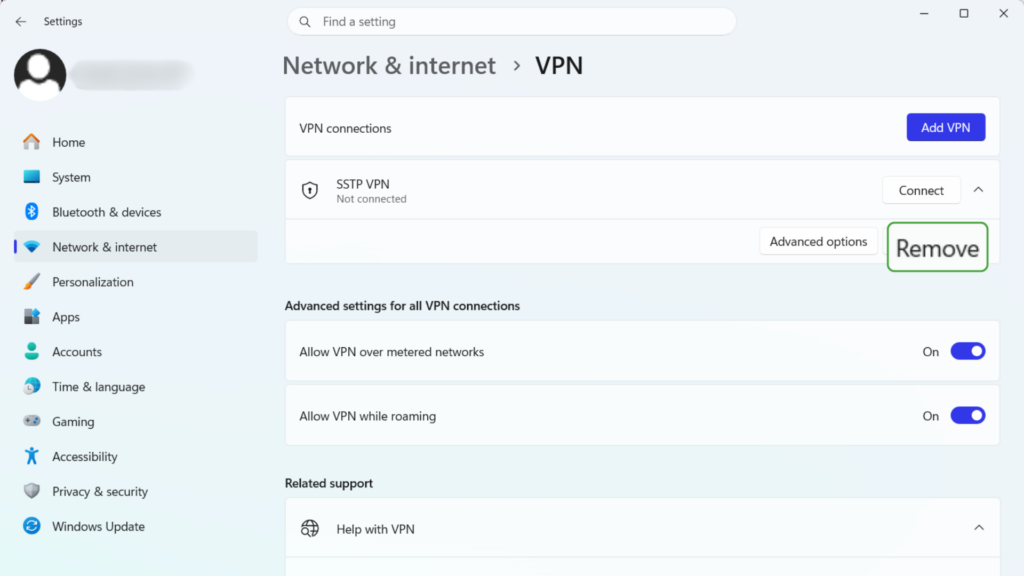
- Go to the Network & Internet settings in Windows and click VPN.
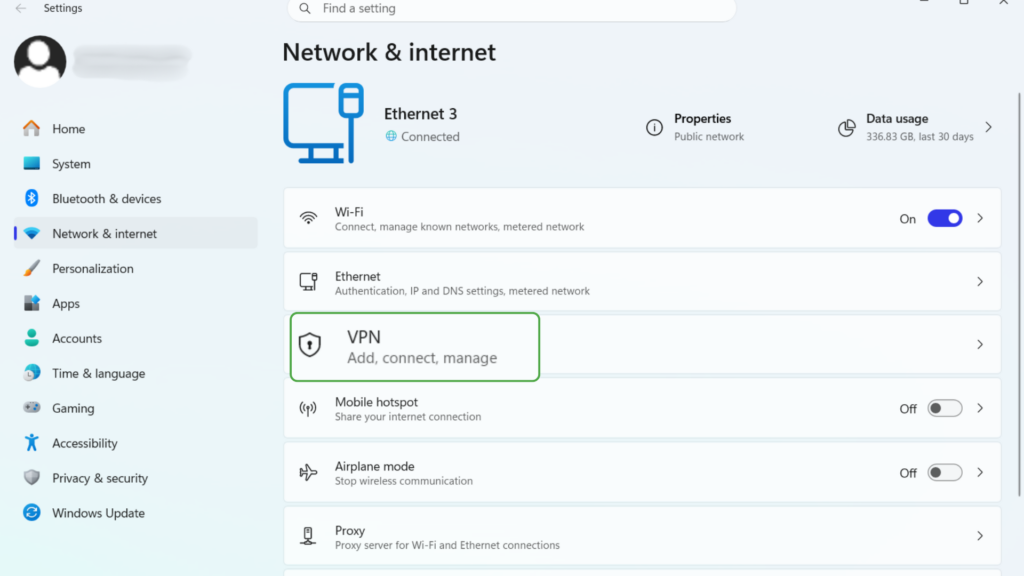
- Disable or remove unused VPN profiles.
Update or Reinstall Network Drivers
A network driver is software that allows your computer’s operating system to communicate with the network hardware, such as a Wi-Fi or Ethernet adapter. An outdated network driver may be incompatible with recent Windows updates or network protocols, leading to connectivity issues. Follow these steps to update your network driver to the latest version:
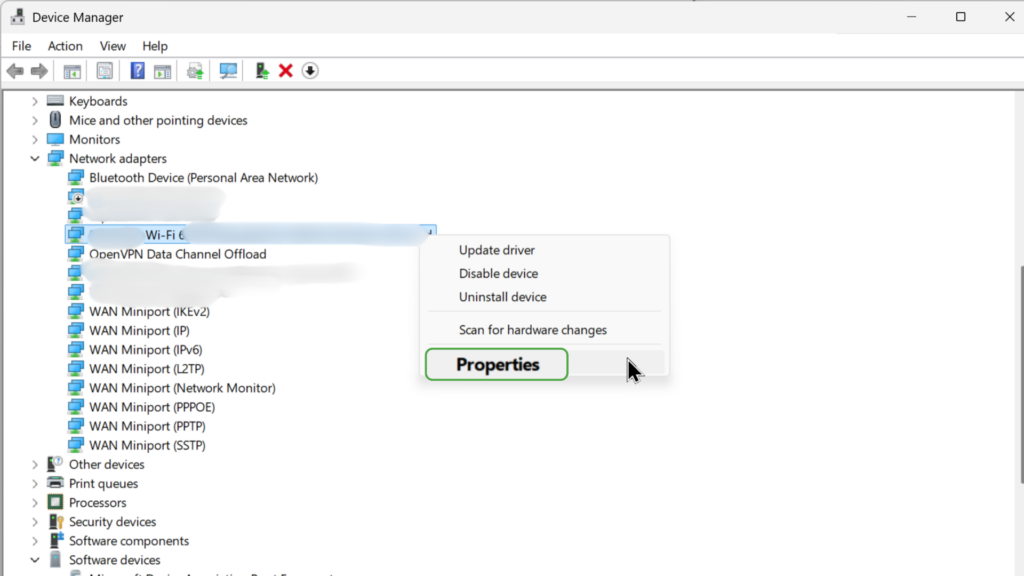
- Press the Win key and type Device Manager into the search box.
- Click on Network Adapters to extend the list.
- Right-click your Wi-Fi adapter and select Update Driver. If an update is found, Windows will install it automatically. If no update was found, right-click your Wi-Fi adapter and select Uninstall Device.
- In Properties, go to Power Management, and uncheck Allow the computer to turn off this device to save power.
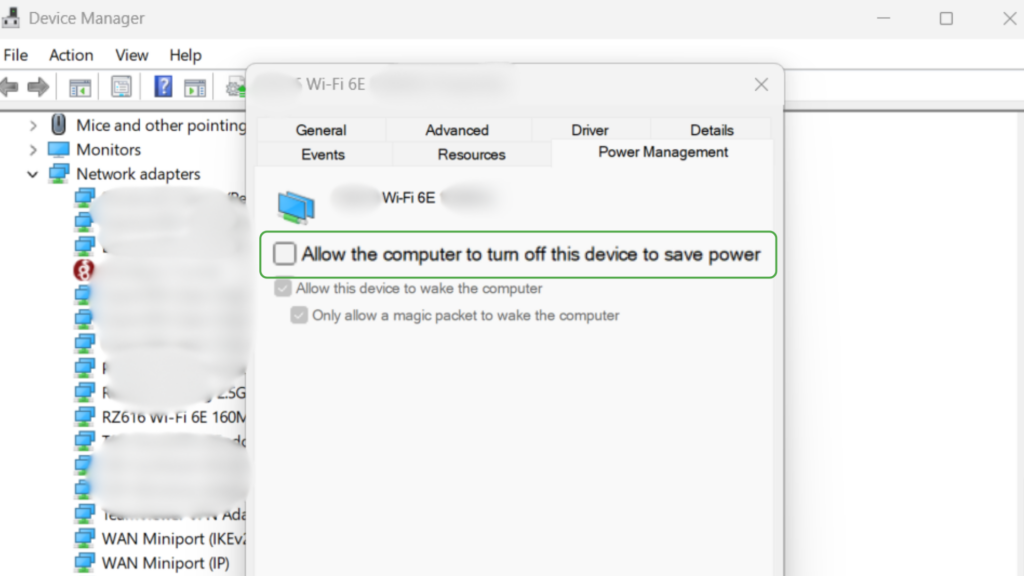
- Restart your computer. Windows will detect your network adapter and install a new driver automatically.
Set DNS Manually
The DNS (Domain Name System) translates website names into IP addresses that computers use to identify each other on a network. A DNS misconfiguration, outage, or conflict can block your device from reaching websites even if it’s connected to a network. Follow these steps to manually reconfigure your DNS settings to use Google’s public DNS service:
- Type ncpa.cpl in the Run prompt (Win+R) to open the Network Adapters settings.
- Right-click your Wi-Fi adapter and select Properties.
- Select Internet Protocol Version 4 (TCP/IPv4) and select Properties.
- Choose Use the following DNS server addresses and enter the following:
- Preferred: 8.8.8.8
- Alternate: 8.8.4.4
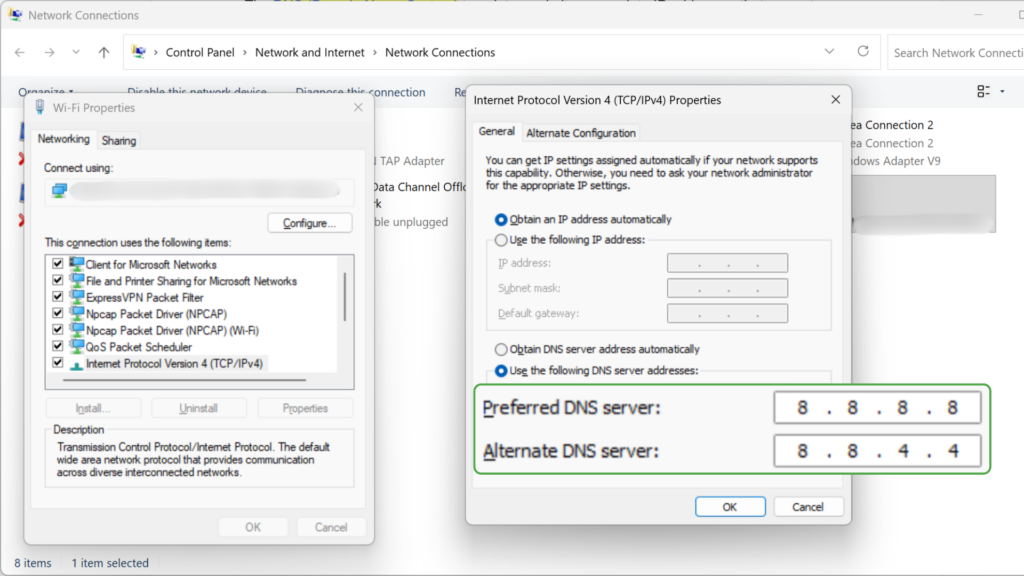
- Click OK and restart your PC.
Use Network Reset
If you’ve tried everything else and you are still seeing the “No internet, secured” error, you can give your network a full reset as a last resort.
- Go to Settings, select Network & Internet, and click Advanced network settings.
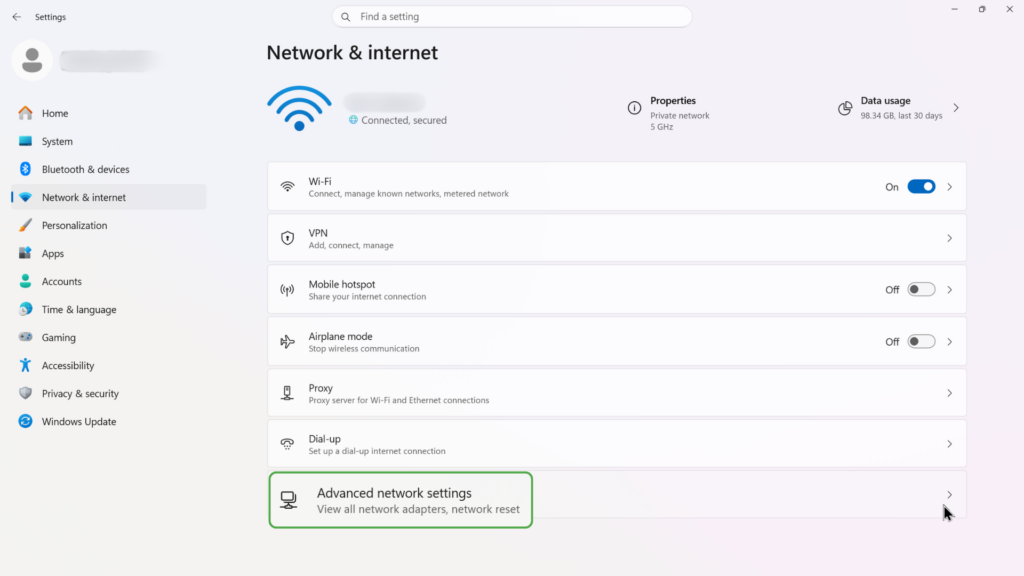
- Choose Network reset.
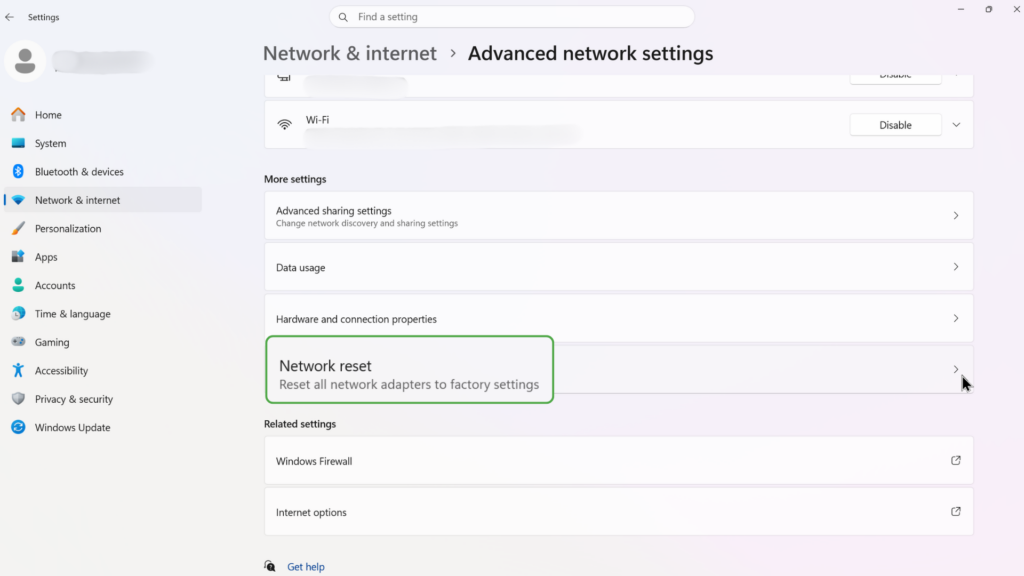
- Click Reset now and restart your PC.
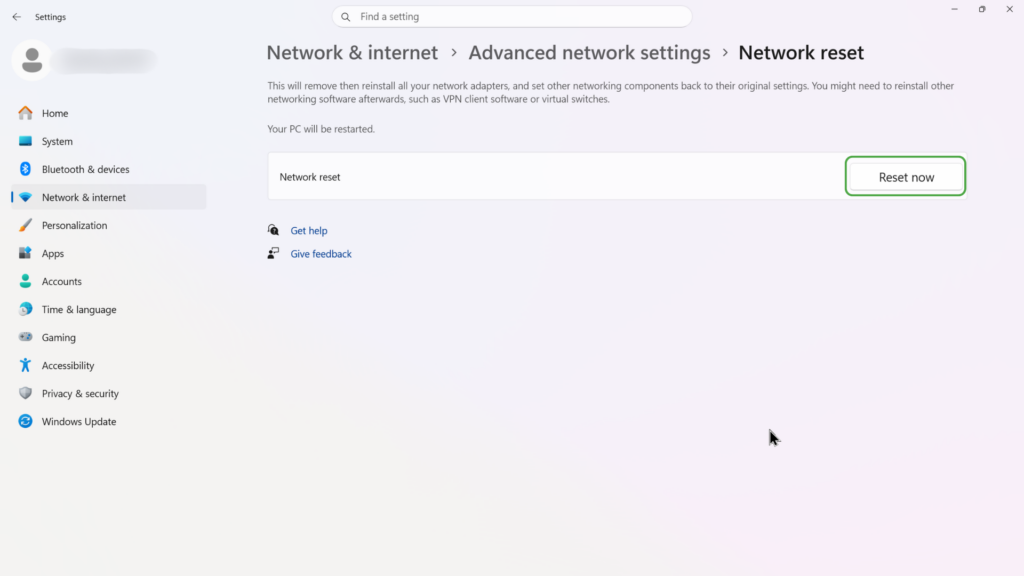
This will reinstall all network adapters and reset all settings to default. Once completed, your network connection should be restored.
Reset Winsock and Network Stack
The Winsock catalog defines how the Windows operating system communicates with network services. If the catalog becomes corrupted, which can happen due to software conflicts, malware, or faulty network drivers, it can disrupt these communications and cause errors like “No internet, secured.”
⚠️ Note that the reset via netcfg -d option suggested below is destructive, capable of deleting adapters, saved wireless profiles, credentials, and installed VPN settings. Use this method only as a last resort and at your own risk.
Resetting the Winsock catalog often resolves this issue by restoring default network settings.
- Open the Terminal (Admin) and enter the following commands one at a time:
- netsh winsock reset (deletes some of your corrupted network settings)
- netsh int ip reset (reinstalls the core internet protocol and IP address configurations)
- netcfg -d (wipes your network adapters completely and reinstalls them)
- Restart your computer.
Why Does My Windows Device Say “No Internet, Secured?”
Don’t panic if you are seeing the “No internet, secured” message on a Windows device. This doesn’t indicate an actual security threat. Instead, it usually points to a misconfiguration or interruption in your network settings. Common causes include:
- IP configuration issues: Your device may have an incorrect or outdated IP address or DNS configuration.
- Conflicts with a VPN or proxy: VPNs can interfere with your connection settings or clash with firewall or security software. This can cause your system to lose internet access even though it remains connected to Wi-Fi.
- Corrupted or outdated network drivers: This can lead to issues with IP address assignment, DNS resolution, or overall connectivity.
- DNS server problems: A DNS server that’s unresponsive, misconfigured, or restricted by a firewall or VPN can prevent you from reaching websites even when you’re connected to Wi-Fi.
- IPv6-related conflicts: Some networks don’t fully support IPv6, so having it enabled can disrupt access to the internet.
- Router or modem issues: Your router may be experiencing issues that prevent it from properly assigning IP addresses or maintaining a stable connection.
Preventing This Issue in the Future
Not being able to get online when you need to is a pain. Even if you’ve fixed the issue for now, you probably want to make sure it doesn’t happen again. Simple things like keeping your network drivers up to date and regularly restarting your router can prevent temporary glitches from interfering with your internet access. Here’s what you can do:
- Keep your network drivers up to date: Regularly check for updates through Device Manager and install the latest version.
- Restart your router periodically: Do this once a month to refresh your router’s internal settings and network connections.
- Avoid conflicting VPNs or security software: Only use trusted VPNs and ensure that no firewalls or antivirus programs are interfering with your IP or DNS settings.
- Use a reliable DNS provider: Set your DNS to stable options like Google (8.8.8.8) or Cloudflare (1.1.1.1) to avoid DNS-related interferences.
- Disable IPv6 if your network doesn’t support it: Some home networks don’t use IPv6 and disabling it can prevent connection failures.
- Use the Windows Network Troubleshooter: Run this regularly, or at the first sign of trouble, to resolve hidden issues before they disrupt your connection.
FAQs
What causes the “no internet, secured” error?
The “no Internet, Secured” error typically occurs due to incorrect IP settings, outdated network drivers, or router issues. It can also be triggered by VPN conflicts, security software interference, or DNS configuration problems.
How do I fix “No internet, secured” on Windows?
Start by restarting your router or PC and disabling your VPN. If the issue persists, use the Windows Network Troubleshooter or more complex solutions like disabling IPv6, updating your network drivers, or switching to a reliable DNS provider.
Why does my Wi-Fi show secured but no internet?
It means your computer is connected to a Wi-Fi network that is password-protected, but is unable to access the internet. Essentially, your connection is secure, but a problem with your DNS settings or IP configuration is preventing access to the internet.
Can VPN cause “No internet, secured” error?
Yes, a VPN can cause the “No internet, secured” error if it conflicts with your network settings or blocks internet access. Sometimes VPN software changes your IP configuration or DNS settings and disrupts connectivity.
How can I check if the problem is on my PC or the network?
Try connecting another device to the same Wi-Fi. If it successfully connects to the internet, the issue is likely with your PC. You can also run the Windows Network Troubleshooter on your PC to diagnose local problems.
