Set Up a VPN at Home: Full Step-by-Step Guide
Setting up a VPN server at home is easier than many people expect. There are three main ways to do it, and the best option depends on your hardware, your ISP, and what you want your VPN to do.
This guide walks through each method in detail, outlines the pros and cons, and helps you decide which approach is the right fit for your needs.
Key Takeaways
- The three most common ways to set up a home VPN are with a spare computer, a cloud server, or your home router.
- Running your own VPN gives you more control, but you’re responsible for setup, maintenance, and ongoing security updates.
- A commercial VPN service may be the better fit if you want minimal maintenance, servers in multiple locations, or enhanced privacy from shared IP addresses.
Table of Contents
Before You Start: Understanding Home VPN SetupsWhich Home VPN Setup Is Right for You?
Method 1: Turn a Spare Computer Into a VPN Server
Method 2: Create a VPN on a Cloud Server
Method 3: Use Your Home Router as a VPN Server
Common DIY VPN Problems and How to Fix Them
Connecting Your Devices
Setting Up a VPN at Home vs. Using a VPN Service
FAQs
Before You Start: Understanding Home VPN Setups
- A home VPN is a VPN server that you host yourself rather than rent from a VPN provider. It lets you connect to a network or server that you control.
- A VPN server is the device that hosts the VPN, authenticates connections, and routes traffic through the VPN tunnel.
- A VPN client is the software on your devices that lets you connect to the server. It functions as a mediator between your device and the VPN server, encrypting your connection.
Using a spare computer (method 1) or a router (method 3) both rely on incoming connections to your home network, which requires a public IP address. Carrier-Grade NAT (CGNAT) can prevent this from working as expected. CGNAT occurs when your ISP shares a single public IP across multiple customers, meaning your home network doesn’t have a reachable public address.
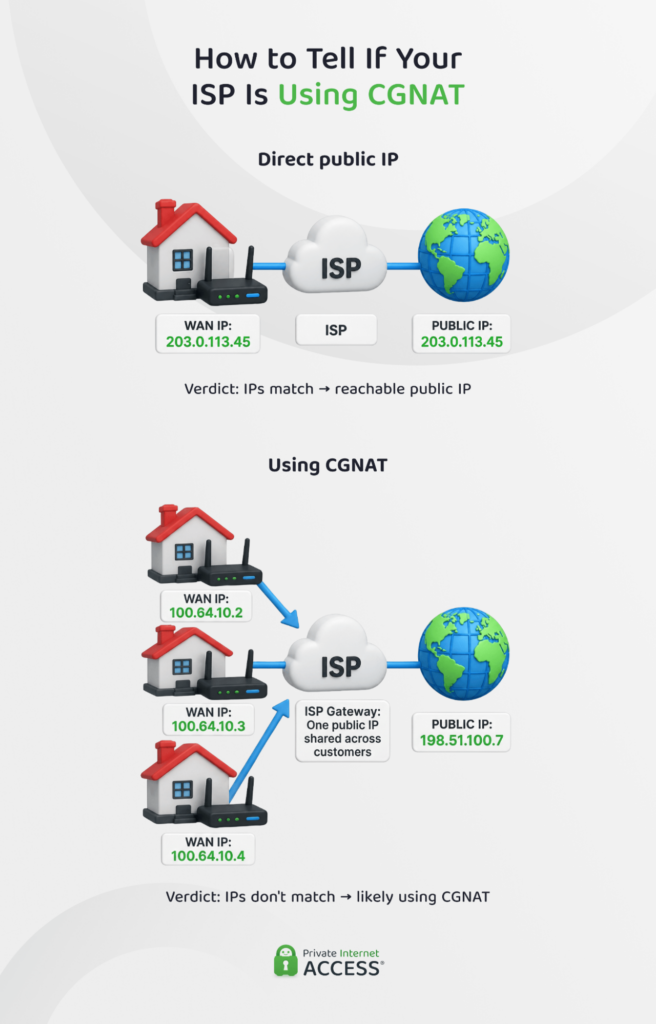
You can compare your router’s WAN IP with your public IP by using a lookup site. If they differ, you’re likely behind CGNAT. In that case, Methods 1 and 3 may require a workaround like a VPS relay, while the cloud server method (Method 2) avoids this issue as the VPS has its own public IP.
For all three methods, you’ll need:
- A VPN protocol: WireGuard and OpenVPN are the most common Linux-supported choices for DIY home VPN projects. WireGuard uses encryption keys and is generally simpler to configure, while OpenVPN relies on certificates and offers more customization. If you’re using Windows, macOS, iOS, or Android, you might want to try IKEv2/IPsec as it’s natively supported by all these operating systems.
- A maintenance and recovery plan: Schedule regular maintenance sessions and know how to recover your setup if something goes wrong.
Read more: WireGuard vs. OpenVPN: Key Differences Explained
Which Home VPN Setup Is Right for You?
The method you choose to create your own VPN shapes the difficulty, cost, and capabilities of your setup.
| Criteria | Spare Computer | Cloud Server (VPS) | Home Router |
| Difficulty | Medium to hard | Easy to medium | Medium |
| Cost | Free if you have hardware | Monthly or pay-as-you-go hosting fee | Free if your router supports it |
| Performance | Limited by home internet | Typically fastest | Depends on router hardware and home internet |
| Remote access to home network | Yes | Requires complex setup | Yes |
| Maintenance | You manage everything | You manage the server | You manage the router |
| Best for | Accessing your home network from anywhere | Running a VPN without relying on your home connection | Covering every device on your network |
A home VPN isn’t always the best solution if:
- Your ISP uses CGNAT, preventing direct incoming connections.
- You want servers in multiple countries.
- You don’t want ongoing maintenance and troubleshooting.
- You need reliable uptime without relying on your own hardware or internet connection.
- Your goal is to reduce your ISP’s visibility into your traffic.
If any of these apply, a trusted VPN service like Private Internet Access may be a better fit.
Method 1: Turn a Spare Computer Into a VPN Server
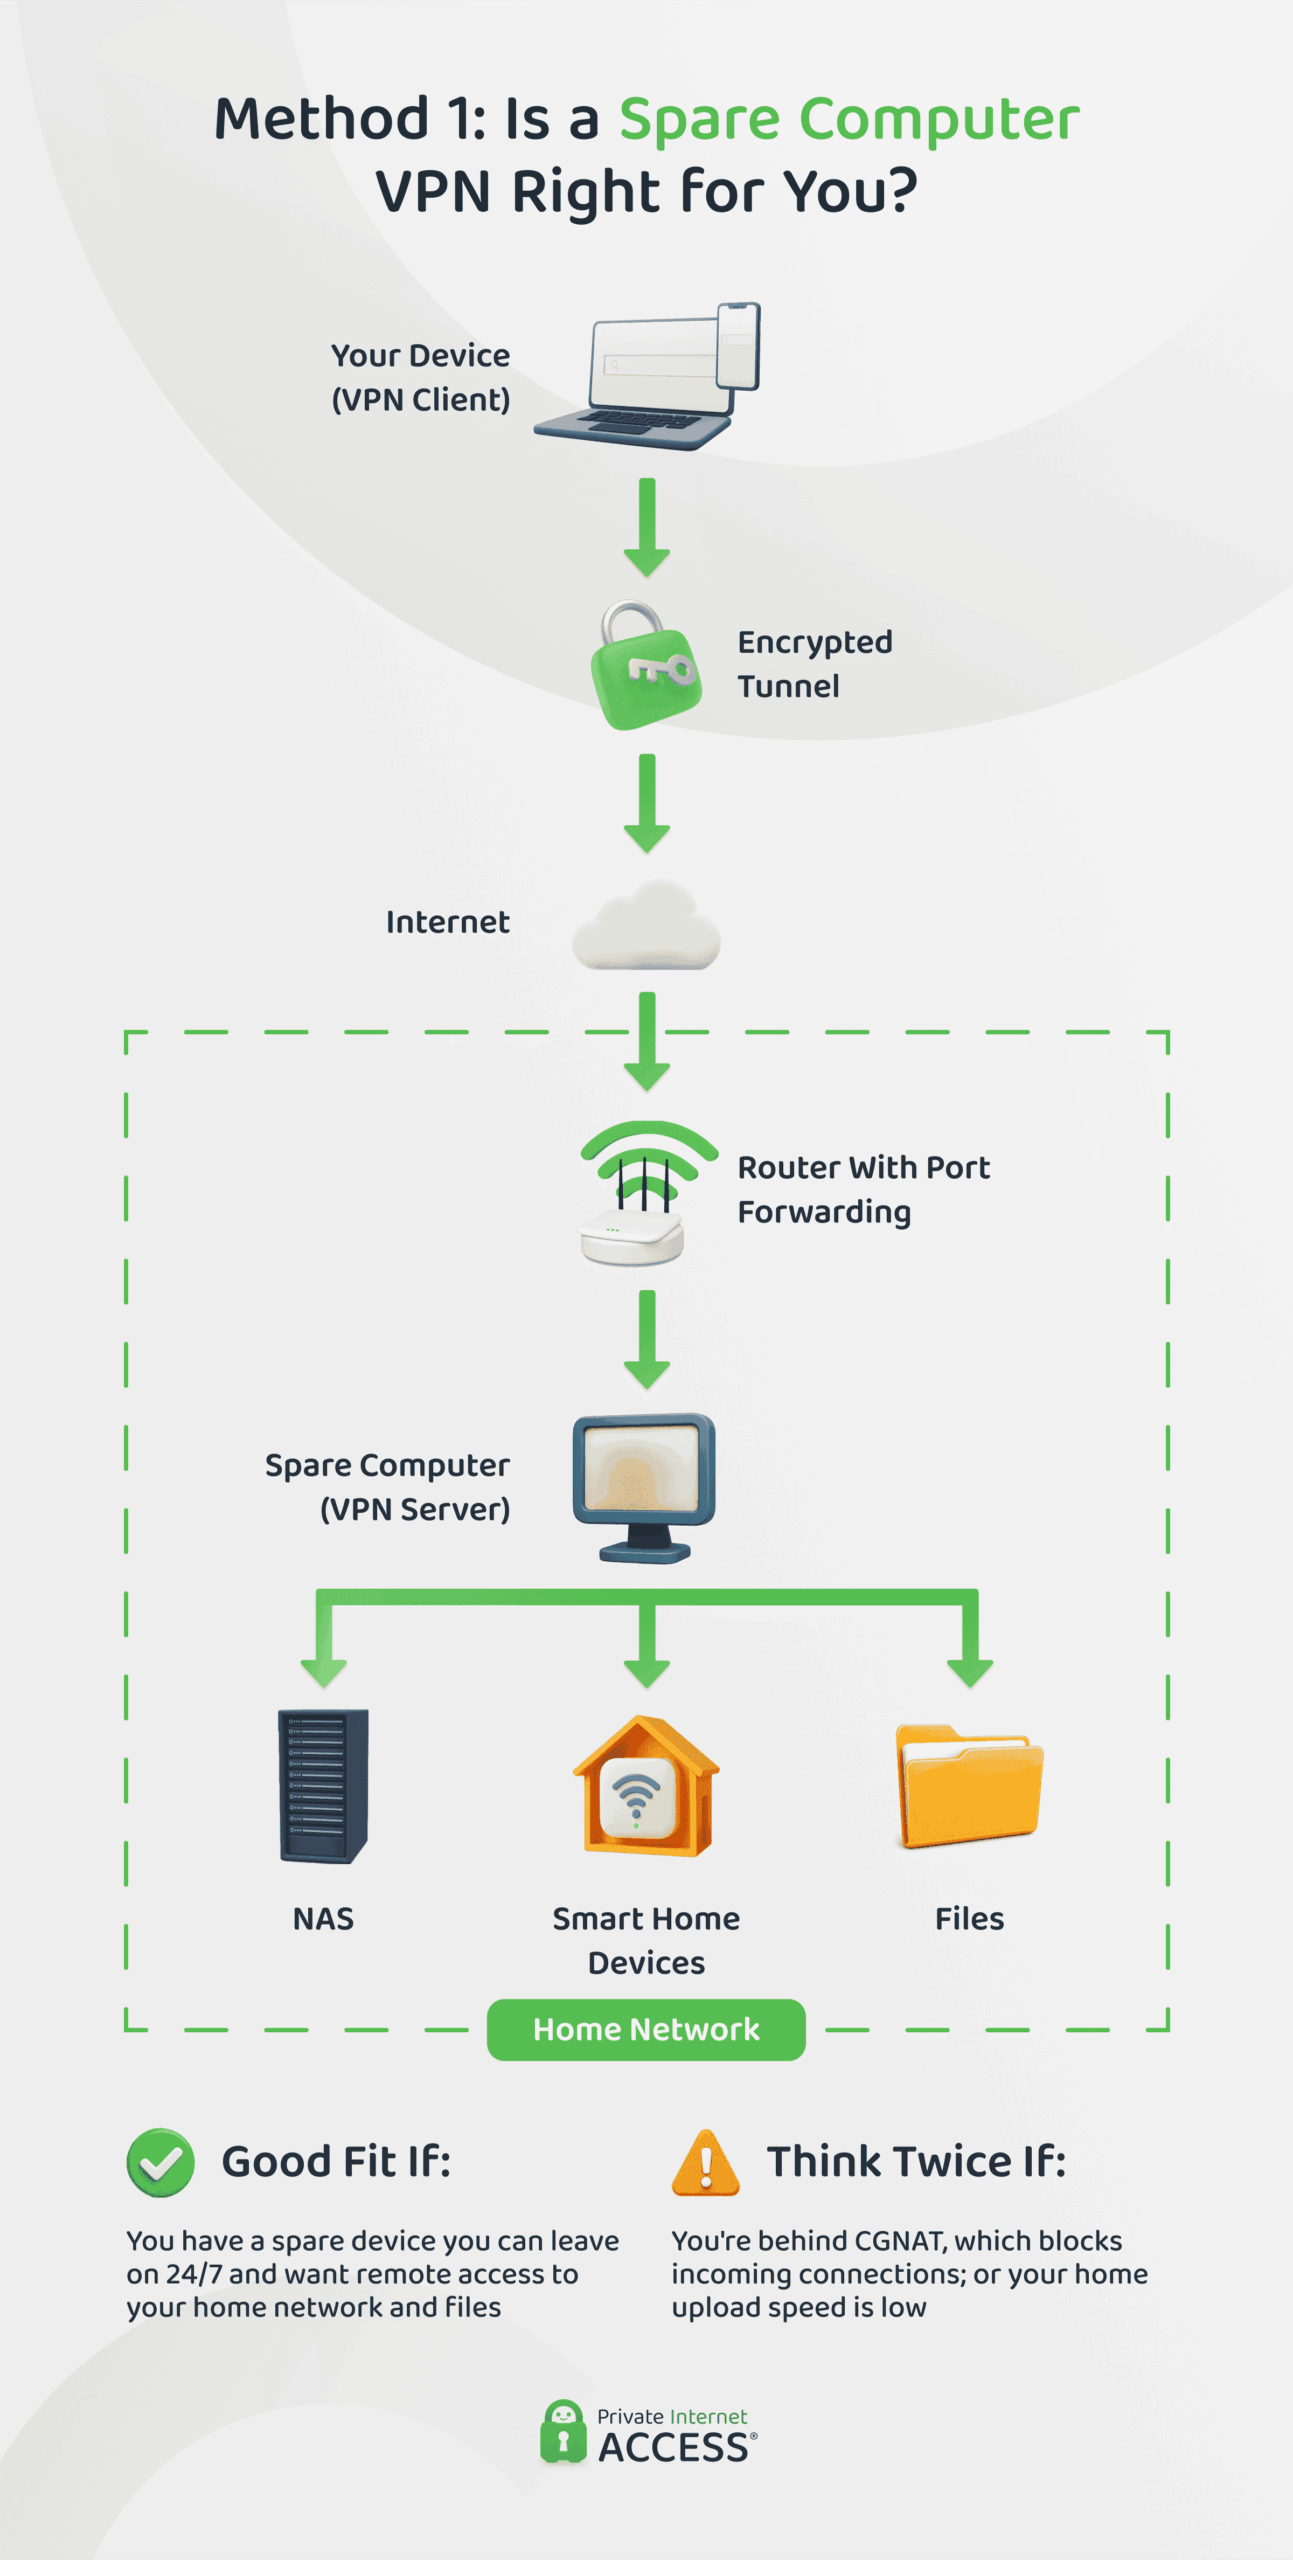
If you have a spare device (old laptop, desktop, mini PC, or Raspberry Pi) that you can leave running, you can turn it into a custom VPN server.
Step-by-Step Setup
- Prepare your device: Make sure it has adequate ventilation and disable sleep or hibernate modes. Any interruptions to the machine break remote access.
- Install a lightweight operating system: Many people choose Ubuntu or Debian. They run efficiently without a graphical interface, which helps to keep the VPN server as the device’s main purpose.
- Install your VPN protocol: Download WireGuard or OpenVPN and follow the installation process.
- Set up authentication: This is how the server verifies who’s allowed to connect. WireGuard creates a public/private key pair for the server and for each device that will connect, then you exchange the public keys. OpenVPN instead uses a certificate authority to issue a certificate for the server and one for each client.
- Assign a static internal IP and define your VPN network: Give the server a fixed internal IP address so your router can find it reliably, then set the network details such as subnet and DNS.
- Configure port forwarding on your router: Port forwarding directs specific incoming traffic to one device on your network. In your router’s dashboard, forward the port your VPN protocol uses to the server’s static internal IP address.
- Configure DDNS: Even with a reachable public IP, many ISPs change it periodically. If yours is dynamic, set up dynamic DNS now so your config files can reference a hostname that stays current, rather than an IP address that may change over time.
- Export your config files: Your protocol generates a configuration file or QR code for each device that will connect. These carry the keys and connection settings the client needs.
- Set up the VPN client and connect: Install the client app and import the config file on your VPN client device.
- Test the connection: Connect to your server and confirm it works from outside your home network so you know remote access is actually functioning.
Read more: VPN Port Forwarding: The Ultimate Guide
Pros & Cons
| Pros | Cons |
| ✅ There’s no monthly fee if you already own the hardware. | ❌ The device has to stay powered on 24/7. |
| ✅ You have full control to manage the setup, credentials, and configuration end to end. | ❌ Performance depends on your ISPs bandwidth and reliability. |
| ✅ You can reach your home network and files from anywhere. | ❌ Every security update and patch is your responsibility. |
Method 2: Create a VPN on a Cloud Server
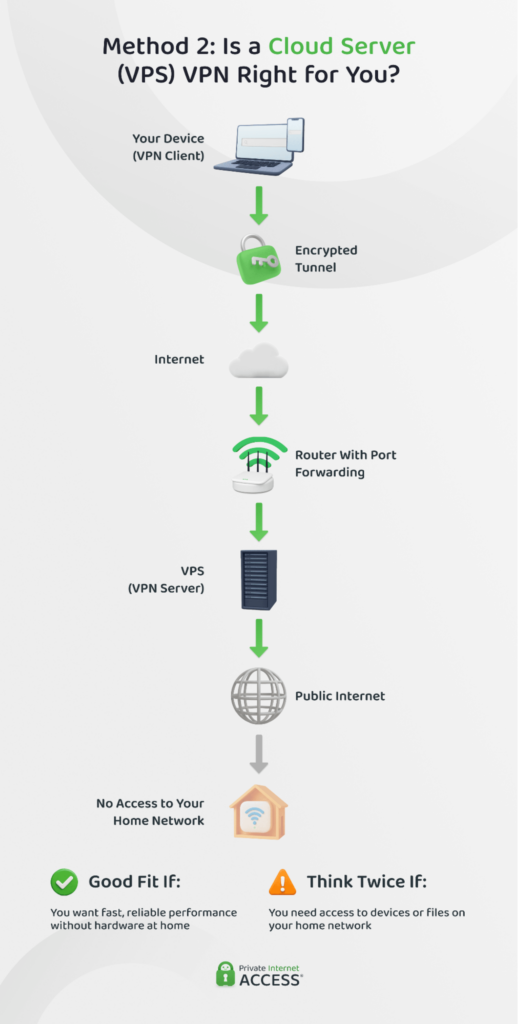
With this method, the VPN runs on a virtual private server (VPS) rather than a machine in your home. This is a slice of a physical server that you rent from a hosting company and manage from your location, removing the need for port forwarding, DDNS, and always-on hardware. The tradeoff is that a cloud-hosted VPN routes your traffic through a data center, so it won’t give you remote access to your home network.
Step-by-Step Setup
The exact steps vary by provider, but this is the typical process:
- Create your VPS: Sign up with a cloud platform (popular options include DigitalOcean, AWS, Microsoft Azure, and Google Cloud) and spin up a new instance. Choose your data center location, OS, CPU, and storage options.
- Set up SSH access: Generate an SSH key pair for a secure login to the server. Most providers let you add your public key during instance creation. We recommend SSH key authentication over password-only access.
- Install your VPN software: Connect to the server using SSH and install WireGuard or OpenVPN via the command line using your OS’s package manager.
- Set up authentication: Complete the VPN software setup process by configuring your authentication method.
- Enable IP forwarding: This lets the server route your traffic to the internet on your behalf.
- Configure the firewall: Open only the port your VPN protocol needs and close everything else to reduce exposure.
- Export your config files: Generate a configuration file or QR code for each device that will connect to the VPN.
- Set up the VPN client and test: Install the client app on your device and import the config file. An online IP-checking tool should show your VPS’s public IP rather than your home IP, confirming traffic is routing correctly.
Pros & Cons
| Pros | Cons |
| ✅ Steadier speeds and more reliable uptime. | ❌ You’ll pay a hosting fee for as long as the server runs. |
| ✅ No hardware maintenance. | ❌ Updates, security patches, and troubleshooting are all your responsibility. |
| ✅ You can pick the server’s region when you set it up. | ❌ Your traffic exits through a single fixed IP linked to your host account, and the provider can see the server’s activity. |
Method 3: Use Your Home Router as a VPN Server
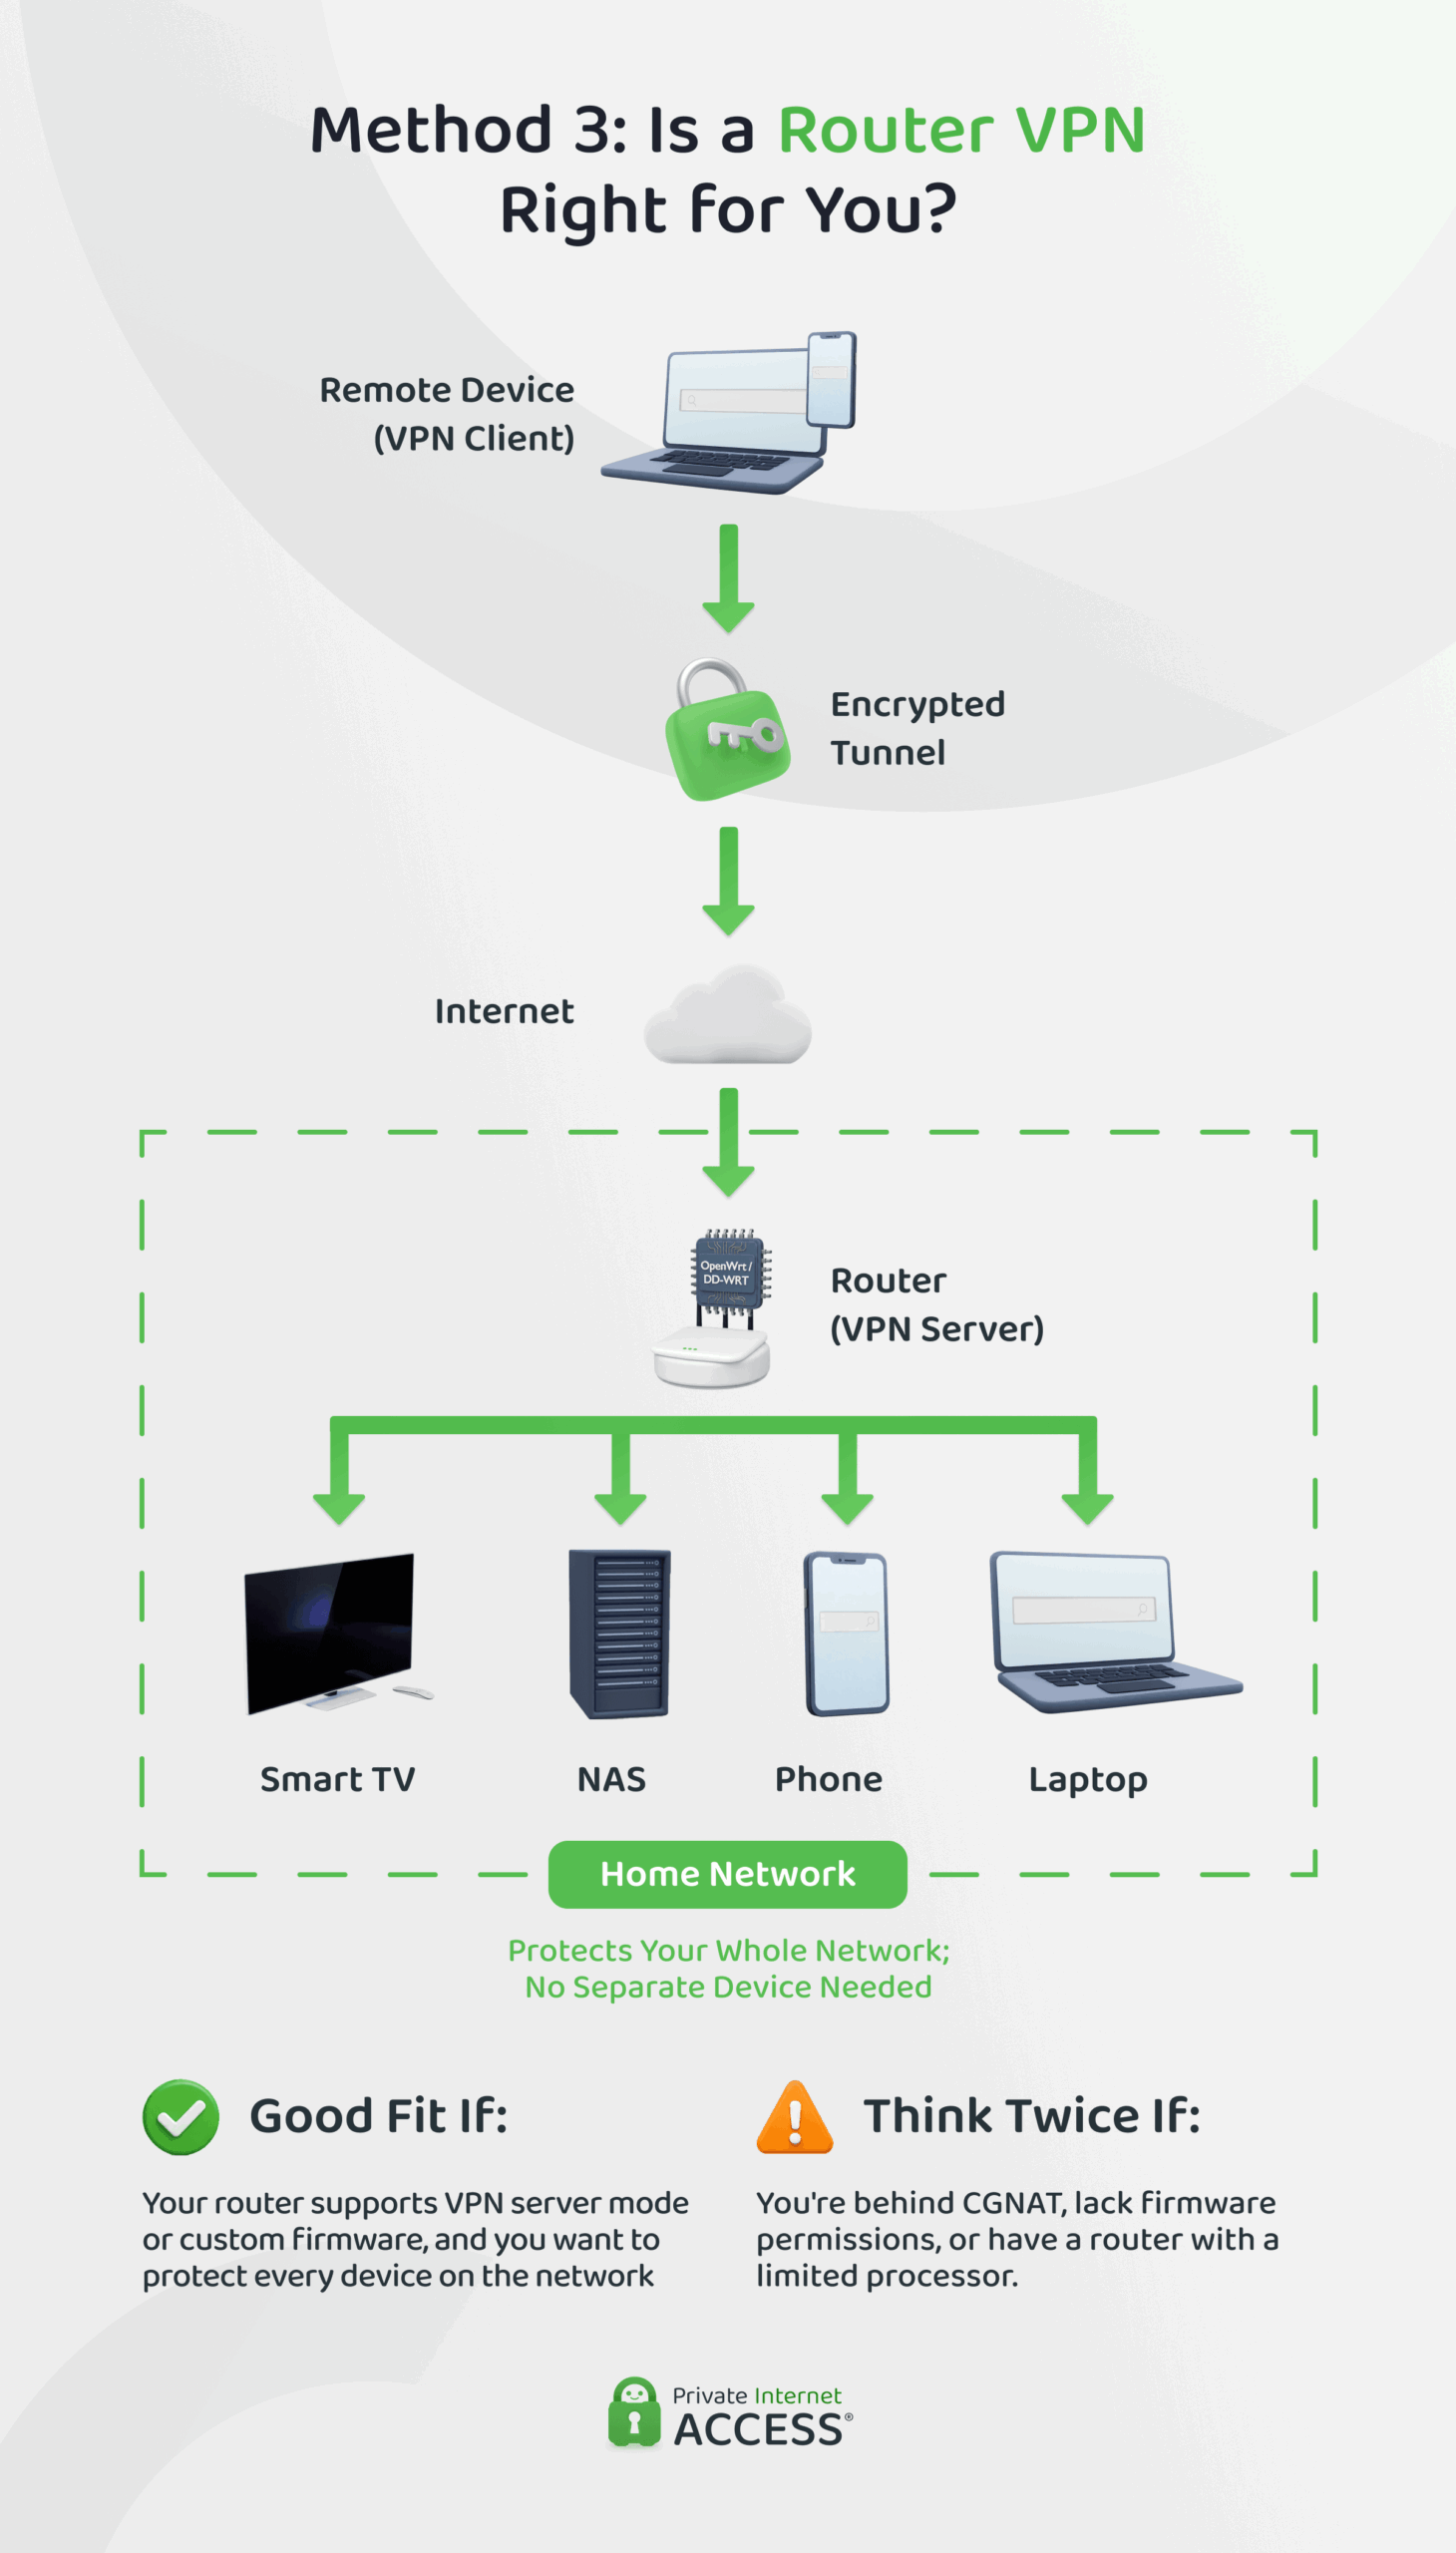
Setting up a VPN server on your router lets you safely connect to your home network from anywhere with an internet connection. Once connected, you can access devices and services on your home network as if you were physically there, making it useful for remote access to files, smart home devices, and self-hosted services.
Router Requirements
Not all routers support VPN server functionality out of the box. If yours doesn’t, you’ll typically need to install custom firmware.
Before you start, three things are worth confirming:
- Router compatibility: Check that the firmware you plan to use supports your exact model. Support is model-specific and the firmware projects publish searchable compatibility lists.
- A reachable public IP: Incoming connections need a public IP that points back to your home network. If your ISP uses CGNAT, this won’t work without a workaround. It’s worth checking what your options are before using this method.
- Permission to modify the router: If your ISP supplied your router, check that you have the right to change the firmware before you start. If not, you’ll need to source a compatible model.
Installing Custom Firmware: OpenWrt or DD-WRT
Flashing, or installing firmware like OpenWrt or DD-WRT to replace the router’s stock firmware, writes the new firmware onto the router to unlock features the original software lacks. Flashing carries real risk, though: a mistake can leave a router unusable, so take your time with this step.
Step-by-Step Setup
- Flash your router: Be sure to use compatible firmware and follow the official guide for your exact model.
- Configure your VPN protocol: Use the router’s admin panel.
- Configure port forwarding and DDNS: Follow the same process covered in Method 1, Steps 6 and 7.
- Generate and distribute your config files: Import them into the client app on each device that will connect remotely.
- Test the connection from outside your home network: If remote access is up, setup is complete.
Pros & Cons
| Pros | Cons |
| ✅ Access your home network safely from public Wi-Fi and other untrusted networks. | ❌ Flashing firmware and configuring the router takes the most time and care. |
| ✅ Reach applications and devices that aren’t exposed to the public internet. | ❌ Compatibility matters: Your router model and ISP’s IP setup both need to support it. |
| ✅ Your router is already running, so there’s no additional device to power or maintain. | ❌ Some router processors aren’t built for encryption, which can impact speeds across your whole network. |
Common DIY VPN Problems and How to Fix Them
Building your own VPN puts you in control but it also puts you in charge when things go wrong. Here are some of the issues you might encounter and what to do about them.
Slow Speeds or Unstable Connections
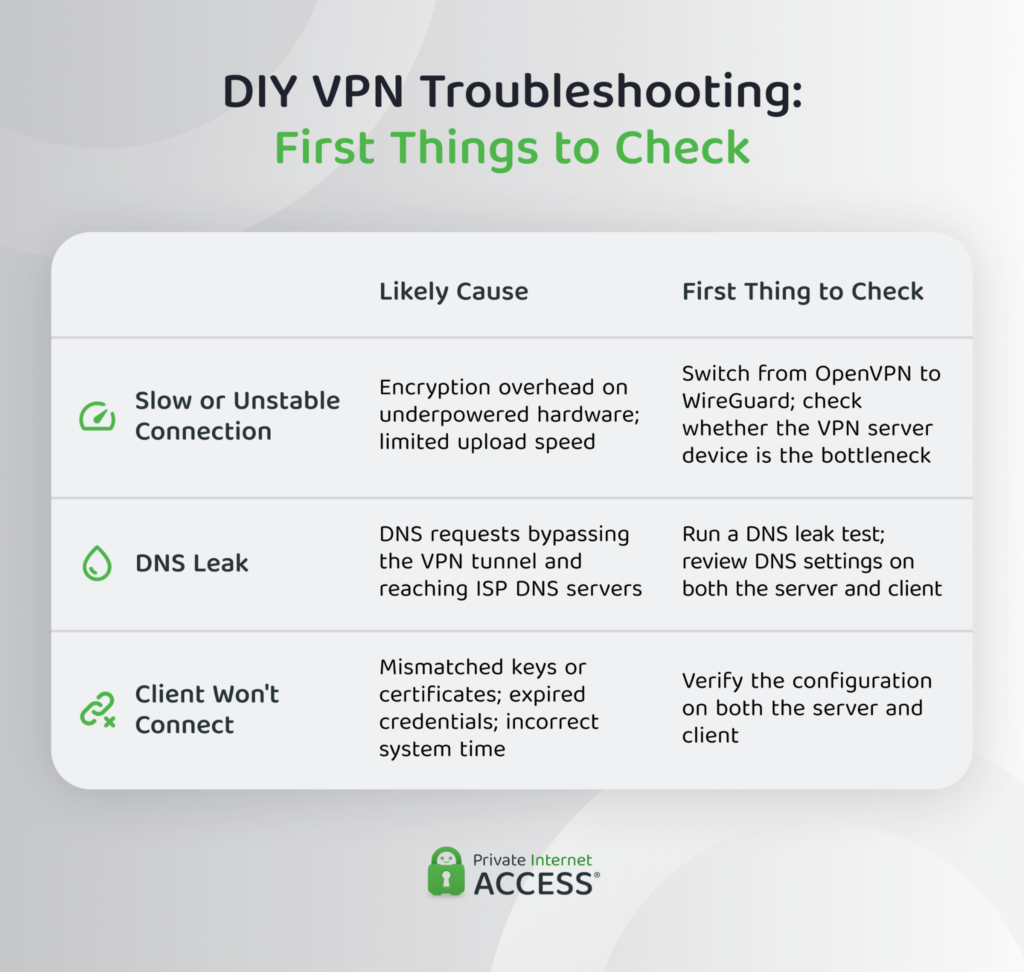
The most common culprit is encryption overhead on underpowered hardware. Routers can struggle with the processing demands of VPN encryption, which caps throughput across your entire home network.
Your home upload bandwidth also sets a ceiling on VPN performance. If your ISP gives you 20 Mbps upload, that’s the maximum any remote device can pull through your home server, regardless of how fast your download connection is.
If speeds are poor, try switching to WireGuard if you’re running OpenVPN, since WireGuard is generally lighter on CPU resources. On a spare computer setup, check whether the machine itself is the bottleneck before looking elsewhere.
DNS Leaks
A DNS leak occurs when DNS requests bypass your VPN tunnel and reach your ISP’s DNS servers instead.
To check for leaks, connect to your VPN and run a DNS leak test. If the results show your ISP’s DNS servers rather than the DNS servers configured for your VPN, review your DNS settings on both the server and client.
Client Connection Failures
Authentication failures are usually caused by mismatched keys or certificates, expired credentials, or incorrect system time. Verify your configuration on both the server and client before troubleshooting anything more complex.
Maintenance and Ongoing Security
A self-hosted VPN requires regular updates and monitoring. Keep your operating system, VPN software, and firmware up to date, and review security advisories for the tools your setup depends on. A simple monthly maintenance schedule is usually enough for most home VPN setups.
Connecting Your Devices
Once your VPN server is running, connect each device to it. Because this guide focuses on WireGuard or OpenVPN, most readers will use a dedicated app. Your device’s built-in client only applies if you choose IKEv2 for your router.
Using a Dedicated App
If you set up WireGuard or OpenVPN you’ll need a dedicated app. The official WireGuard app and OpenVPN Connect app are both available across major platforms.
Both let you import the config file your server generated, often by scanning a QR code on mobile, which is usually quicker than entering server details manually.
Using Your Device’s Built-in VPN Client
Windows, macOS, Android, and iOS all include a VPN client in their settings, but these support only IKEv2 and L2TP/IPSec. This path applies only if you configured your router with IKEv2.
For IKEv2, the menu path varies slightly between OS versions, but this is the general path:
- Windows: Settings > Network & Internet > VPN > Add a VPN Connection.
- macOS: System Settings > VPN > Add VPN Configuration.
- Android: Settings > Network & Internet > VPN > Add.
- iOS: Settings > General > VPN & Device Management > VPN > Add VPN Configuration.
Setting Up a VPN at Home vs. Using a VPN Service
Building your own VPN gives you full control, but it’s not always the most practical choice. For some use cases, a commercial VPN service can be a better fit.
You can either install an app on each device you want to protect, or configure the VPN on your router to cover your entire home network.
| Criteria | Home VPN | VPN Service |
| Setup time | Manual configuration, can be time-consuming | App installs in minutes |
| Maintenance | Ongoing updates, patches, and fixes | Handled by the provider |
| Security | Depends on your configuration and technical ability | Depends on provider infrastructure and features |
| Control | Full customization | Based on app settings and available features |
| Server locations | Limited to your own hardware | Multiple countries and locations |
| Ease of use | Technical knowledge required | User-friendly apps with simple setup for most devices |
| Remote access to home network | Yes | No |
If you’re reluctant to give up the control that drew you to a DIY build, it’s worth knowing a commercial VPN doesn’t have to mean a locked-down app.
Private Internet Access (PIA) pairs a managed service with power-user controls many DIY builders look for. You can choose your protocol and encryption level, use split tunneling, set up port forwarding, and add a dedicated IP. You also benefit from the extra protection of our Kill Switch, which is not readily available for most DIY builds. In short, you enjoy much of the customization with far less of the upkeep.
FAQs
How can I set up a VPN on my home network?
There are three main ways to create a VPN server on your home network: install VPN server software on a spare computer, rent a cloud server (VPS) and configure it remotely, or set it up on your router. Before you start, it’s worth knowing that each method requires handling your own setup, maintenance, and security updates.
How much does it cost to build a VPN?
The cost depends on which home VPN setup you choose. A spare computer or compatible router can cost little to nothing if you already own the hardware, while a cloud-hosted VPN involves VPS fees that vary depending on the features you opt for.
What are the benefits of setting up my own VPN?
The main benefit of setting up your own VPN is having full control over the entire setup. You decide who hosts your VPN server (or whether to run one yourself), choose the server location, customize features, and manage access. That said, building and being responsible for the maintenance and ongoing security requires a solid technical understanding.
How long does it take to build a VPN?
Most DIY VPN projects take between 30 minutes up to many hours, depending on your experience and setup method. Cloud servers are generally the quickest option, while router-based setups usually require more time and configuration.
Is creating your own VPN legal?
Yes, in most cases you can legally create a VPN. Just remember that doing anything illegal with a VPN counts as criminal activity. Always check your location’s local laws and use VPNs within legal limits.
Can you make your own VPN for free?
Yes. You can turn a spare computer into a VPN server or use a compatible router to make your own VPN without paying for software or a subscription. Keep in mind that “free” doesn’t cover your time or the electricity required to keep a device powered on.
How can I secure and maintain my VPN server over time?
Regular updates, upgrades, and security patches are essential for keeping your VPN server stable and secure over time. Alternatively, using a managed VPN service like Private Internet Access removes the maintenance burden altogether.
