Can You Use a VPN With Starlink? Setup & Troubleshooting Tips
Starlink is compatible with VPNs, but performance depends on the VPN you choose and how it works with your Starlink kit. For better or worse, factors like your Starlink plan, VPN protocol, and even satellite handoffs can all affect your experience.
In this guide, we’ll show you the factors that shape the Starlink-VPN relationship, how to set up a VPN to work with Starlink, and what to do if something isn’t working the way you’d expect.
Table of Contents
Does Starlink Work With VPNs?Benefits of Using Starlink With a VPN
Disadvantages of Using a VPN for Starlink
Optimal VPN Protocols for Starlink
How Do I Set Up a VPN With Starlink?
How to Get the Best Starlink VPN Setup
Common Starlink VPN Issues and Fixes
FAQ
Does Starlink Work With VPNs?
The short answer is yes, Starlink works with VPNs. But the way Starlink connects to the internet changes how VPNs work compared to typical cable or fiber setups.
Starlink connects you to the internet through low Earth orbit (LEO) satellites instead of cables or cell towers. This mechanism is what enables Starlink to provide internet to people in hard-to-reach areas that broadband usually can’t reach.
The delivery method helps to increase coverage, but it also changes how your connection handles networking. Your dish doesn’t communicate with one fixed satellite. Rather, it passes the connection between satellites as they move overhead and routes your traffic down to a ground station before it reaches the wider internet.
Carrier-Grade Network Address Translation (CGNAT) is part of this process. Most Starlink plans place you behind CGNAT, meaning you share a public IP address with other Starlink users rather than getting one of your own.
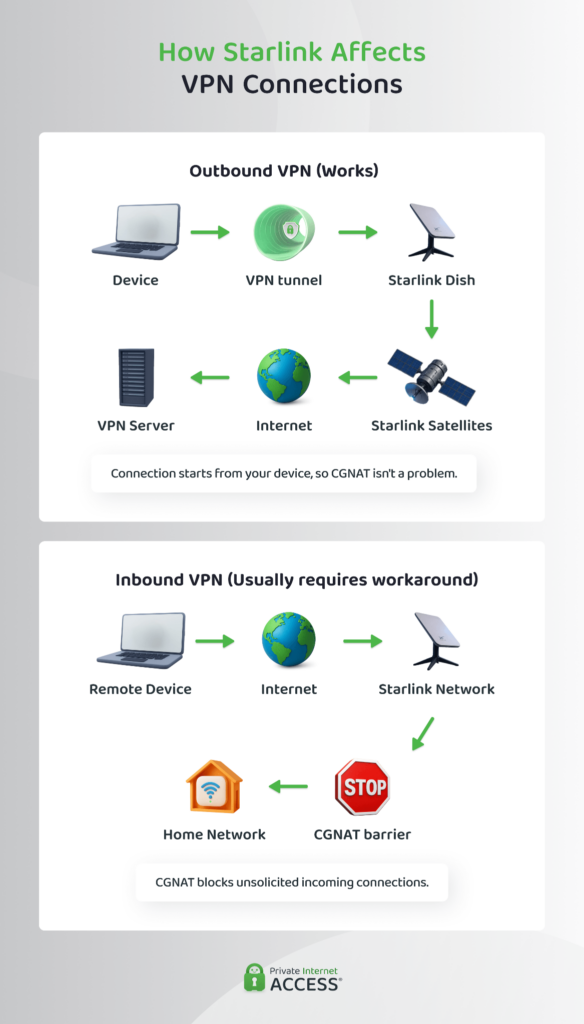
This helps Starlink manage a limited pool of addresses from the IPv4 network class across a huge customer base, but it also blocks incoming connections to your network by default. This means that things like remote access, hosting a server, or running a Starlink site-to-site VPN don’t necessarily work the way they would on a connection with a dedicated public IP.
A VPN can help here, but how much it helps will depend on whether you’re sending traffic out to the open internet or receiving it on your network.
Outbound VPN Connections
An outbound VPN connection happens when your device initiates the connection to a VPN server, such as when you connect to a personal VPN or one your employer requires for remote work.
Usually, CGNAT doesn’t get in the way here. Since your device is the one starting the connection, Starlink’s shared IP address isn’t a barrier – the VPN server only needs to respond to a request you’ve already sent, not reach in and find you first.
In practice, this means streaming through a VPN, securing your browsing on public networks, or logging into a work VPN all behave the same way on Starlink as they would on any home broadband connection.
The one thing that can occasionally interrupt an outbound VPN session on Starlink is the brief connection drop that happens during satellite handoffs. It’s usually only for a second or two and most VPNs reconnect on their own, but this can affect your browsing experience.
Inbound VPN Connections
An inbound VPN connection happens when something outside your network needs to connect to a device or service on your network, like a remote worker connecting to a home server, a security camera you’re checking while away, or a site-to-site VPN linking two office locations.
This is where CGNAT can become a bit of a problem. Because your Starlink connection shares a public IP address with other users, there’s no way for an external request to land on your specific network. Standard port forwarding doesn’t work here either, since Starlink’s CGNAT sits upstream of your router.
The result is that a straightforward inbound setup which might work on cable or fiber often breaks when Starlink comes into the picture.
Benefits of Using Starlink With a VPN
A VPN adds the privacy and security benefits you’d expect on any connection. On Starlink, a few other advantages come into play:
- An extra layer of encryption: Starlink encrypts traffic between your dish and its network, but a VPN adds encryption between your device and the VPN server for an additional layer of privacy.
- Reduced Starlink visibility: While Starlink can still see that you’re connected to a VPN server, it can’t see the encrypted contents you send through the VPN tunnel or the websites and services you connect to.
- Fewer CAPTCHAs and verification checks: Because CGNAT puts you on a shared IP address, websites sometimes flag that address for unusual activity, triggering extra CAPTCHAs or login checks. A VPN can give you an external IP, which can reduce how often this happens.
Disadvantages of Using a VPN for Starlink
As with anything, a Starlink VPN brings tradeoffs alongside its benefits. A few of these are more noticeable on Starlink than they would be on a standard connection.
- Added latency: Starlink’s satellite link already carries more latency than cable or fiber. A VPN adds its own small delay on top of that, since a VPN encrypts and routes traffic through a server before reaching its destination. This is usually minor with a fast VPN like PIA, but it’s more noticeable than it would be on a wired connection.
- More sensitivity to satellite handoffs: A VPN maintains an active encrypted connection, so the brief interruptions that happen when your dish switches satellites can occasionally cause a VPN session to drop or pause.
- Extra setup: Installing a VPN app on a device is quick, but covering every device on your network means adding a third-party router because the Starlink router itself can’t run a VPN.
Optimal VPN Protocols for Starlink
Most modern VPNs use either WireGuard or OpenVPN, which both work with Starlink. But because Starlink relies on satellites to provide a connection to the internet, these protocols might behave differently than they normally would.
WireGuard is generally the better fit for Starlink. It’s a newer, leaner protocol that handles network address translation traversal (NAT-T) with minimal overhead and faster reconnections after the drops that can come with satellite handoffs.
NAT-T negotiates a connection through a shared IP address like Starlink’s CGNAT, preventing unsolicited inbound traffic. This usually translates to a faster, more stable connection on the carrier.
OpenVPN is a solid runner-up, particularly if you need to get a VPN working on older hardware or a router that doesn’t support WireGuard. It handles NAT-T reliably but has more overhead, which can be more noticeable on a connection that already has some inherent latency from the satellite link.
It’s worth trying WireGuard first, but OpenVPN is a dependable fallback if your router or VPN doesn’t support WireGuard.
How Do I Set Up a VPN With Starlink?
Since Starlink plans may require different setup steps, it helps to know how your plan affects what’s possible, since that shapes which setup method actually makes sense for you.
Starlink Plans and VPN Compatibility
Before setting up a VPN, it’s worth understanding what your Starlink plan actually allows. While outbound VPNs will generally work the same everywhere, inbound VPN connections will depend on whether your service includes a public IP.
Starlink’s Personal plans (Residential and Roam) are for individual and household use. They also come with the same limitation for VPN usage: they sit behind CGNAT, so you share a public IP address with other users rather than getting one of your own.
Unfortunately, neither plan offers a way to get a public IP. This doesn’t make a difference when it comes to outbound VPN use, like browsing or streaming, but it does mean you’ll need a workaround for inbound use.
Business plans offer a public IP, which gives inbound traffic somewhere to land. The IP here is dynamic rather than static. It tends to stay the same as long as your terminal stays in place, but it can change if you move it or Starlink reprovisions your connection.
How to Set Up a VPN for Starlink on a Router
The Starlink router doesn’t support VPN clients. If you want a VPN protecting every device on your network simultaneously, you’ll need to connect a third-party, VPN-compatible router and let it handle the VPN instead.
- Confirm your Starlink hardware has Ethernet access. Gen 3 routers and the Mini have built-in Ethernet ports, but older Standard or Gen 2 kits need the separate Starlink Ethernet adapter.
- In the Starlink app under Settings > Advanced, enable Bypass Mode. This switches off the Starlink router’s own Wi-Fi since your third-party router will take over that role.
- Connect your third-party router’s WAN port to the Starlink router (or Ethernet adapter) using an Ethernet cable.
- Log in to your new router’s admin panel, go to the VPN settings, and enter your VPN provider’s configuration details. Learn more about setting up PIA VPN on your router.
- Save your settings, connect a device, and check your IP address to confirm that it’s changed.
How to Set Up a VPN With Starlink via an App
If you don’t need network-wide coverage, installing a VPN on individual devices is the simplest way to use a VPN with Starlink. It takes a few minutes, needs no router configuration, and works the same way it would on any other connection.
Here’s how to set up PIA VPN on a device:
- Download the PIA app for your device from the PIA website or your device’s app store.
- Install the app and open it. Allow PIA VPN to add VPN configurations to your device, if prompted.
- Log in using the username and password from your PIA account confirmation email.
- Choose a server location or leave it on the default setting to connect to the fastest available server.
- Tap the power button to connect. Once it turns green, you’re connected and the VPN starts encrypting your traffic.
Repeat this on each device you want covered. PIA doesn’t limit how many devices you can connect at once, so this works whether you’re protecting a single laptop or every device your household uses on Starlink.
How to Get the Best Starlink VPN Setup
Some VPN features matter more on Starlink than they do on standard broadband. Here’s what’s worth prioritizing when you’re choosing one.
WireGuard or OpenVPN
A VPN that supports WireGuard, OpenVPN, or both gives you flexibility if one protocol underperforms on your connection. From time to time, satellite handoffs can interrupt a session, so being able to switch protocols rather than locking into one means you’ve got a fallback if your setup isn’t performing optimally.
Large Network of Servers
Having servers spread across a variety of countries and locations means you’re more likely to find one that’s both close to you and lightly loaded, which matters when your connection already has some baseline latency from the satellite link itself.
Fast Connection Speeds
A VPN always adds some overhead to your connection. That said, the difference between a well-optimized server and a congested one can be significant. Look for a provider with high-capacity infrastructure since this keeps the VPN speed loss from stacking on top of whatever latency Starlink’s satellite link already has.
Easy-to-Use Applications
You’ll already have to operate your Starlink kit with an app, so you don’t want your VPN to add more complications to your personal tech stack. An intuitive VPN app makes it easier to switch servers, change protocols, or troubleshoot a dropped session without requiring advanced networking knowledge.
24/7 Support
Starlink’s own troubleshooting guidance can sometimes treat a VPN as something to disable and rule out, not something they’ll help configure. That makes your provider’s own VPN support desk the only place you’ll get real help if something goes wrong, so it’s worth checking what support it offers and when it’s available.
Private Internet Access (PIA) VPN checks all of these boxes and many more. With transparent, open-source apps and a court-proven No-Logs policy, you can be sure of the highest level of VPN protection. New subscribers can try it completely risk free with our 30-day money-back guarantee.
Common Starlink VPN Issues and Fixes
There are a few common problems that a VPN can cause on a Starlink connection:
- VPN keeps disconnecting: This is usually down to satellite handoffs interrupting the active connection rather than a problem with the VPN itself. Switching to a more resilient protocol like WireGuard and enabling auto-reconnect in your VPN app usually resolves it.
- Slow speeds: A small amount of speed loss is normal with any VPN. But if it feels excessive, test your connection without the VPN first to rule out a Starlink-side issue. If Starlink’s fine on its own, try switching to a closer VPN server or a faster protocol, or enabling split tunneling to send only essential traffic through the VPN.
- VPN not connecting: Start by switching your VPN off to confirm that everything is working on Starlink’s side. Then you’ll want to try a different server or protocol on your VPN app, or double-check your configuration settings on your router.
- Remote network access denied: This is almost always CGNAT, not a fault with your VPN. You’ll need to use a workaround like a Starlink service plan with a public IP or a tool built to tunnel through CGNAT.
- Extra verifications for logins: Again, this is more likely CGNAT’s shared IP triggering security checks than your VPN. Switching VPN servers usually clears this up, since you’ll present a different IP to the site.
FAQ
What is Starlink VPN passthrough, and do I still need my own VPN?
A VPN passthrough happens when a router allows VPN traffic through to your network automatically. It’s not a unique Starlink feature. This passthrough itself doesn’t offer any real protection for your connection, so you’ll need to add a VPN app to your personal tech stack for extra security.
Which VPN protocols work with Starlink’s CGNAT?
WireGuard and OpenVPN both handle CGNAT well, but WireGuard is the better fit for Starlink. That’s because it manages NAT traversal with less overhead and reconnects faster after satellite handoffs. OpenVPN remains a solid fallback if your router or provider doesn’t support WireGuard.
Can you use a VPN on every Starlink plan (Residential, Roam, Business)?
Yes, but there are considerations to take into account. Outbound VPN use, like connecting to the open internet, works across all plans. Inbound use is different because it only works with a public IP address. Business plans come with the option to enable a public IP address, allowing you to use an inbound VPN. For Personal plans, you’ll need to find a workaround.
Can I run a site-to-site VPN over Starlink?
This depends on your Starlink plan. On Residential or Roam plans, CGNAT blocks the inbound connections a site-to-site VPN needs. You could do this on a Business plan if it enables the public IP option. It’s also possible to do on any plan if you use a workaround.
How do I disable a VPN on Starlink?
To disable a VPN on Starlink, simply open your VPN app and disconnect. If you set up your VPN through a third-party router using bypass mode, you’ll need to factory reset your Starlink router. You can’t switch off bypass mode any other way.
